


Living rooms serve as versatile hubs for conversation, relaxation, and entertainment, which makes balanced illumination essential for daily comfort. Walking into a space with an undersized flush mount can make the ceiling look sparse and leave seating areas in shadowy dimness. Conversely, hanging an oversized chandelier can overpower modest furniture and create an uncomfortably cramped atmosphere. Understanding what size light fixture for living room layouts need allows homeowners to strike the right balance between decorative scale and functional ambient illumination. Proper proportions ensure that the primary fixture anchors the room while providing enough light spread for daily activities.
Selecting the correct dimensions involves measuring the physical boundaries of the room along with vertical ceiling clearance. While hanging pendant lights at proper heights often follows dedicated table or island measurements, general living area fixtures must accommodate foot traffic and visual sightlines. Fixture profile, open-frame construction, and socket count also dictate how large a piece feels in a shared space. By matching physical fixture dimensions with ceiling height and room volume, you can establish an inviting environment that feels both cohesive and bright.

Guidelines for Sizing Living Room Ceiling Light Fixtures
Determining the ideal light fixture size for a living room starts with a straightforward proportional rule based on room footprint. To find the target diameter in inches, add the length and width of the room in feet. For instance, a living space measuring twelve feet by fourteen feet calls for a fixture with a diameter of approximately twenty-six inches. Vertical clearance requires equal attention, as standard residential ceilings demand at least seven feet of open space between the floor and the lowest edge of the light. Balancing these two dimensional rules guarantees that the fixture commands adequate presence without obstructing traffic or crowding sightlines.
The Standard Dimensional Formula for Fixture Diameter
The classic interior design guideline provides a reliable baseline for any enclosed or clearly defined living area. Measure the two primary room dimensions in feet using a reliable tape measure. Add those two numbers together and convert the total sum directly into inches. A compact room measuring ten feet by twelve feet produces a combined measurement of twenty-two, pointing toward a twenty-two inch diameter light. This proportional approach prevents a tiny light from looking lost while keeping oversized pieces from dominating the ceiling plane.
Large family rooms require a thoughtful adjustment when the calculated diameter exceeds standard retail fixture dimensions. In an expansive eighteen by twenty-foot living space, the formula yields a thirty-eight-inch diameter recommendation. Homeowners who prefer not to install an enormous centerpiece often divide the footprint into dedicated functional zones. Installing two complementary semi-flush fixtures or pairing a central unit with perimeter recessed cans delivers balanced coverage across the entire floor plan. This technique maintains proper lighting ratios across open architecture without requiring an unwieldy custom fixture.
Open-concept layouts present unique challenges because living rooms frequently blend directly into dining spaces or entry halls. Rather than calculating dimensions based on the entire open floor plan, define the specific conversational seating boundary. Measure the footprint bounded by the sofa, accent chairs, and area rug to establish your effective room size. Using this conversational perimeter prevents you from installing an excessively huge fixture that overwhelms the cozy seating arrangement. Focused measurements help keep the overhead light scaled directly to the furniture grouping below.
Ceiling Height Clearance and Vertical Profile Selection
Ceiling height dictates how much vertical drop a fixture can have before it becomes an obstruction. Standard eight-foot ceilings offer little room for long hanging chains or dramatic downrods. In these rooms, a flush mount or low-profile semi-flush mount provides the safest and most proportionate solution. Maintaining a minimum clearance of seven feet from the bottom of the shade to the floor ensures that family members and tall guests move freely underneath. Semi-flush fixtures remain especially practical because they drop just enough to cast soft light upward against the ceiling.
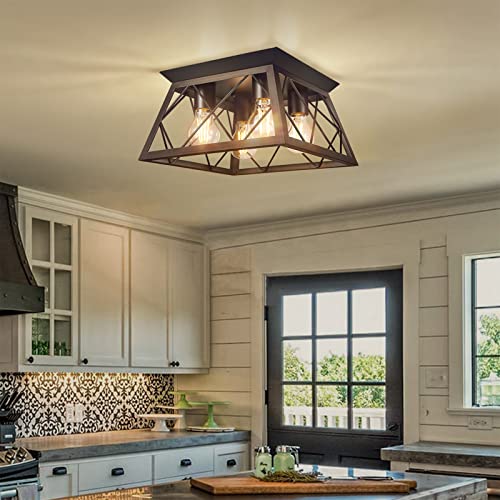
Semi-flush fixtures like three-light black metal and glass units bridge the gap between tight flush mounts and sprawling chandeliers. By dropping several inches below the ceiling canopy, they allow ambient light to reflect off the ceiling surface while illuminating the room below. This indirect reflection visually lifts the ceiling plane and makes standard rooms feel more spacious. Because the body stays compact, the overall height remains safely above normal pedestrian clearance. Selecting a fixture with clean geometric lines ensures an elegant profile without consuming precious vertical headroom.
Living rooms with nine-foot, ten-foot, or vaulted ceilings offer greater flexibility for multi-tier fixtures and pendant configurations. As vertical space increases, add approximately two to three inches of fixture height for each additional foot of ceiling height above eight feet. A nine-foot ceiling comfortably accommodates a fixture with a vertical body height of twenty to twenty-four inches. For double-height great rooms, hanging fixtures should occupy the central third of the vertical volume to preserve visual cohesion. Always verify that adjustable downrods or chain links allow precise leveling during installation.
Sizing Overhead Lights Over Seating Areas and Coffee Tables
Ceiling fixtures placed directly over stationary coffee tables or central ottomans allow for slight exceptions to standard walkway clearance rules. When an overhead light sits above a permanent table, foot traffic cannot pass directly beneath it. This setup allows you to lower the fixture slightly to create an intimate seating atmosphere without creating a head-bump hazard. The bottom edge should still remain at least six to six and a half feet above the floor to maintain clear sightlines across the room. Clear sightlines ensure that seated guests can converse comfortably without the fixture blocking their view.
Proportional sizing relative to the coffee table itself prevents an awkward visual clash between furniture and lighting. A good guideline suggests choosing a fixture diameter equal to one-half to two-thirds the total width of the coffee table below. An overhead fixture that extends wider than the coffee table can feel top-heavy and visually precarious. Conversely, a tiny flush mount suspended over a substantial wood table creates an underwhelming focal point. Aligning the footprint of the lighting fixture with your core furniture anchor produces a unified design scheme.
When arranging living room seating off-center from the original ceiling junction box, do not feel obligated to force your furniture under the light. Centering a fixture in the room while the sofa grouping sits in a corner can make the entire living room feel lopsided. Relocating the junction box or using a swag hook with an extended chain allows you to align the fixture directly above the conversation grouping. Alternatively, keeping a low-profile flush mount at the ceiling center while using floor lamps over the seating cluster offers an easy compromise. Proper alignment anchors the functional heart of the room effectively.
Visual Weight and Open-Frame Versus Solid Shade Fixtures
Physical dimensions tell only half the story when assessing how a fixture interacts with living room proportions. Visual weight refers to how dense or solid an object appears within a three-dimensional space. A thirty-inch drum fixture wrapped in thick fabric fabricates a heavy, commanding silhouette that visually shrinks smaller living areas. In contrast, an open geometric cage design in the same thirty-inch diameter allows sightlines to pass straight through. Because of this transparency, open-frame fixtures often let you install slightly larger sizes without overwhelming modest rooms.
Four-light open cage fixtures combining dark metal bands and natural wood frames illustrate this principle of airy visual balance. The open sides allow light to radiate in all directions rather than trapping illumination inside an opaque cylinder. This expansive spread brightens wall surfaces, which makes living room boundaries feel farther apart. The natural wood texture adds warmth and architectural interest without adding visual bulk. For rooms near the lower boundary of a dimensional calculation, an open frame provides substantial presence while maintaining a light aesthetic.
Clear glass shade fixtures offer a similar advantage by displaying bulb filaments without creating dark physical shadows. Transparent glass cups capture and bend light while keeping the upper zone of the living room visually uncluttered. Matte black iron frames combined with clear glass shades provide a timeless aesthetic that suits both modern and rustic decors. The primary consideration with transparent glass involves keeping the shades free of dust and smudges to preserve clarity. Regularly dusting glass components ensures that your fixture retains its airy appeal and crisp illumination.
Calculating Living Room Lumen Needs and Multi-Bulb Sockets
Selecting the right size fixture must also correspond with adequate lumen output to properly illuminate your living space. Living rooms generally require ten to twenty lumens per square foot to support casual entertaining, reading, and relaxation. A two-hundred-square-foot living room therefore requires an overall ambient target between two thousand and four thousand lumens. A single-bulb fixture rarely generates enough output to meet this target on its own. Multi-socket fixtures distribute that required output across multiple sources, softening harsh glare and providing broad, even coverage.
Fixtures equipped with three or four standard medium E26 sockets offer practical versatility for achieving target lumen levels. Operating three sixty-watt equivalent LED bulbs in a semi-flush fixture easily provides around twenty-four hundred lumens of ambient light. A four-socket flush mount fixture can deliver over three thousand lumens, depending on the bulb wattage selected. Distributing lumens across three or four sockets eliminates intense hot spots beneath the fixture. This even distribution helps illuminate dark corners and bounce gentle light across the ceiling.
Bulb wattage ratings marked on fixture sockets represent critical electrical safety thresholds that must never be exceeded. Many residential flush and semi-flush fixtures specify a maximum rating of sixty watts per socket for incandescent bulbs. Installing modern LED bulbs allows you to achieve high brightness while drawing only eight to ten actual watts per socket. This lower electrical draw reduces operating heat inside ceramic sockets and prolongs component life. Always consult the socket label before selecting replacement bulbs for any ceiling fixture.
Layering Overhead Light with Lamps and Accent Fixtures
No matter how accurately you size your central ceiling light, relying exclusively on one overhead fixture creates an unflattering environment. Single-point ceiling lighting tends to cast downward shadows beneath facial features and leaves lower seating zones poorly illuminated. Interior lighting performs best when built from three balanced layers: ambient, task, and accent. The overhead ceiling fixture serves as the foundational ambient layer, establishing general brightness across the living space. Adding secondary fixtures fills in vertical gaps and provides flexible illumination for specific activities.
Task lighting supports activities such as reading, writing, crafting, or board games without requiring glaring overhead illumination. Integrating targeted fixtures like table lamps next to end tables or floor lamps behind armchairs gives occupants control over personal light levels. When organizing functional corners, reviewing techniques for positioning reading lamps for targeted light provides useful principles for directing glare-free beams toward seated users. Task lights should sit at a height where the shade shields direct bulb glare from resting eyes. This thoughtful placement keeps the living room comfortable during prolonged evening relaxation.
Accent lighting completes the triad by highlighting artwork, architectural features, bookcases, or decorative plants. Wall sconces, picture lights, and discreet uplights create depth and visual texture around the perimeter of the room. When accent lights illuminate walls, the eye perceives the entire living room as wider and more welcoming. Pairing perimeter accent pieces with your properly scaled central fixture prevents the cave-like effect common in under-lit rooms. Balancing these layers gives you the flexibility to adapt room brightness for both festive gatherings and quiet movie nights.
Dimmer Switch Compatibility and Bulb Selection for Daily Comfort
A properly sized living room fixture requires adjustable control to match diverse daily lighting requirements throughout the evening. Full brightness might be necessary when cleaning or hosting a game night, but softer output suits movie viewing. Installing a compatible wall dimmer switch gives you seamless control over light output across multi-bulb fixtures. Ceramic light sockets paired with standard E26 bases generally support dimmer switches, provided you install dimmable bulbs. Using non-dimmable LED bulbs on a dimmer circuit often causes distracting buzzing noises or persistent flickering.
Color temperature profoundly influences the mood and perceived size of your living room environment. Color temperature is measured in kelvins, ranging from warm yellow tones to crisp blue daylight hues. Living areas typically thrive in the warm white range of twenty-seven hundred to three thousand kelvins. This warm spectrum complements wood furniture, neutral fabrics, and warm wall colors while creating a cozy, restful ambiance. Higher color temperatures above four thousand kelvins can feel overly clinical and harsh in residential gathering spaces.
Bulb aesthetics matter significantly when choosing open cage fixtures or clear glass shade fixtures with visible sockets. Traditional frosted bulbs diffuse light effectively, but vintage-style Edison LED bulbs with exposed filament designs provide decorative charm. When using clear bulbs, pair them with a dimmer switch so that bare filaments do not cause visual discomfort. Clear filament bulbs cast crisp, clean light that highlights the metal and wood craftsmanship of the fixture. Checking the base type and bulb diameter ensures seamless fit inside open cage wire structures.
Installation Safety, Structural Support, and Routine Care
Installing a ceiling light fixture safely requires inspecting the electrical junction box and shutting off power at the breaker panel. Never rely on a wall toggle switch alone when disconnecting or mounting electrical fixtures. Verify that the ceiling junction box is securely anchored to a ceiling joist and rated to support the fixture weight. Most standard flush and semi-flush units weigh under ten pounds and mount securely to standard round or octagonal boxes. If upgrading to a massive chandelier or heavy metal fixture, install a fan-rated or heavy-duty structural junction box.
Following safe installation practices also extends to long-term maintenance and keeping shades free of dust buildup. Just as homeowners learn specific methods for cleaning delicate ceiling fixtures, semi-flush and open cage lights require periodic surface care. Always turn off the wall switch and allow bulbs to cool completely before wiping metal canopies or glass shades. A soft microfiber cloth removes accumulated dust and pet dander without scratching protective dark brown finishes or matte coatings. Keeping reflective surfaces and glass clean maximizes light transmission across the living room.
Checking electrical wiring and socket integrity during annual cleanings ensures long-lasting operation and household safety. Inspect ceramic sockets for any signs of heat discoloration, loose mounting screws, or damaged wire insulation. If you notice persistent flickering, burning odors, or warm canopy plates, disconnect power immediately and evaluate connections. When encountering older wiring, complex multi-way switch circuits, or ceiling boxes lacking grounding wires, consult a licensed electrician. Professional electrical verification guarantees that your chosen fixture operates safely and reliably for years to come.
Matching the physical dimensions of your ceiling fixture to the square footage and vertical clearance of your living room creates a welcoming and harmonious interior. By combining length and width measurements in feet to determine diameter in inches, you avoid common scale missteps that disrupt room flow. Pairing that properly proportioned ambient centerpiece with dimming controls and layered secondary lamps ensures flexible, glare-free illumination throughout the day. Taking precise room measurements and respecting clearance requirements gives you a beautifully lit space tailored for relaxation and entertaining.




Write Your Review
No reviews yet. Be the first to share your experience!