


Installing vanity lighting transforms daily grooming routines, but hanging a fixture at an awkward height can create harsh, unflattering shadows across your face. Many homeowners wonder how high should light be above bathroom vanity mirrors when remodeling a master bath or updating a small powder room. Positioning a light properly delivers balanced task illumination right where you need it for shaving, applying makeup, or styling hair. While general ceiling fixtures supply ambient brightness, placing the vanity light at the correct elevation keeps glare out of your eyes and brightens the entire counter surface.
Bathroom mirrors come in many shapes and frame profiles, which means a rigid single measurement rarely fits every bathroom wall configuration. Balancing ceiling clearance, mirror heights, and personal eye levels helps establish an attractive focal point that functions smoothly every day. If your bathroom layout also features supplemental heating or dedicated ceiling units, coordinating your vanity lighting alongside heat lamps for bathroom warmth creates a comfortable environment. Taking time to map out your electrical box and fixture dimensions before cutting drywall prevents frustrating wall repairs and keeps your installation project moving forward.


Standard Dimensions and Height Rules for Bathroom Vanity Lights
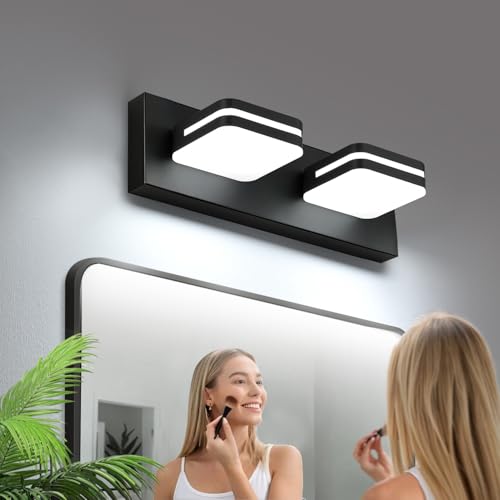
The ideal mounting height for a bathroom vanity light placed above a mirror sits between 75 and 80 inches from the finished floor to the center of the fixture. This measurement positions the illumination slightly above average eye level, casting smooth light downward without creating harsh glares in your reflection. Depending on the size of your mirror, the height of your ceiling, and whether your fixture points upward or downward, you may need to adjust this baseline by several inches. Taking the time to evaluate your room’s specific dimensions ensures your vanity area remains practical and visually balanced.
The Standard Mounting Height Above the Floor
Measuring from the finished floor provides the most dependable benchmark for locating your electrical box. Most lighting guidelines suggest placing the center of the vanity light backplate approximately 75 to 80 inches above floor level. This range works well for most adults because it keeps the bulbs comfortably above eye level while distributing light across the sink area. If primary household members are taller or shorter than average, shifting the mounting line toward the higher or lower end of that range helps maintain flattering task visibility.
Finished floor height takes into account your actual flooring material, including thick tiles or underlayment that can alter measurements taken during early framing stages. Measuring before tiles are installed can easily throw your final electrical box placement off by half an inch or more. Always verify the thickness of the planned subfloor and finished tile before drilling through wall studs. When the fixture sits at the proper floor-relative height, the light wraps around your features rather than casting deep shadows under your brow or chin.
Measuring Distance Between Mirror and Light Fixture
The gap between the top edge of your mirror and the lowest point of your light fixture should typically span between 1 and 5 inches. Leaving a small buffer prevents the fixture from crowding the frame while maintaining a unified vertical visual line. If you hang the light too close to the mirror, heat from bulbs or moisture trapped behind glass shades can cause issues over time. Conversely, placing the light more than 6 inches above the frame creates an awkward visual disconnect that leaves the top of the mirror looking stranded.
Mirror styles play a major role in how you calculate this specific gap. Frameless mirrors often sit flush against drywall, allowing slightly tighter spacing without physical interference. Mirrors with ornate, thick wood or metal frames require extra clearance so the fixture shades do not touch the molding. You should measure from the absolute top of the outer frame rather than the reflective glass surface to ensure your final spacing looks symmetrical.
Side Sconces Versus Over-Mirror Bar Lighting
Overhead vanity bars remain the most common choice for compact powder rooms and standard bathroom layouts. However, wall sconces placed on either side of the mirror provide exceptional cross-illumination that eliminates downward facial shadows entirely. Sconces should generally mount with their centers positioned between 60 and 65 inches above the finished floor, putting the bulbs roughly at eye level. This eye-level alignment projects light directly toward your face, creating the ideal setup for detailed grooming.
Spacing between side sconces also dictates how effective their illumination will be. Ideally, sconces should sit roughly 28 to 36 inches apart to frame the mirror and your reflection naturally. If your vanity mirror is wider than 40 inches, mounting sconces on adjacent side walls or shifting to an overhead bar fixture often makes more practical sense. Tight wall spaces between adjacent corners or medicine cabinets can also restrict sconce placement, making an over-mirror light bar the most sensible configuration.
Many homeowners choose to combine ambient overhead lighting with dedicated wall fixtures to achieve balanced bathroom illumination. Exploring wall-mounted sconce fixtures provides helpful perspective on how directional shades and decorative sconces direct beam spread along vertical surfaces. In large primary bathrooms with double vanities, installing two separate overhead bars or a combination of sconces and overhead lights provides complete coverage across both basins. Layering your light sources prevents dark corners and ensures your bathroom stays adaptable for both quick visits and relaxed evening routines.
How Fixture Shape, Shade Direction, and Rotation Affect Mounting Height
Fixture design directly alters where the light source ends up relative to your electrical junction box. Multi-light sconce bars featuring downward-facing shades drop the actual bulbs several inches below the mounting plate. If you mount a downward fixture at 75 inches from the floor, the bulbs might hang at 69 inches, which could interfere with a tall mirror. When installing fixtures with downward glass shades, like traditional multi-light designs, you may need to position the junction box higher on the wall to preserve mirror clearance.
Fixtures designed with upward-facing shades reverse that calculation by projecting light toward the ceiling. Upward fixtures soften shadows by bouncing light off the ceiling drywall, but they require adequate headroom to avoid scorching paint or creating hot spots. You should maintain at least 3 inches of clearance between the top of upward glass shades and the ceiling surface. Reversible fixtures, such as the Ascher multi-light wall sconce, allow you to orient the shades upward or downward depending on your mirror height and vertical wall constraints.
Modern integrated LED vanity bars introduce rotatable designs that give you flexible beam control without moving the junction box. Models like the Torondo vanity light feature 360-degree swivel joints, while the YHTlaeh fixture offers 270-degree rotation and the VOLISUN bar incorporates a 180-degree swing head. This adjustability allows you to aim light directly downward toward the counter, outward toward your reflection, or upward for indirect ambient glow. Being able to rotate the light head helps compensate for slight mounting height variations, letting you direct beams exactly where task lighting is needed.
Factoring in Ceiling Height and Crown Molding
Standard eight-foot ceilings generally provide plenty of room for an over-mirror light bar paired with a typical 30-to-36-inch mirror. In these spaces, keeping the fixture centered vertically in the space between the top of the mirror and the ceiling creates an attractive, proportional balance. If your ceiling measures eight feet, an electrical box placed at 76 to 78 inches leaves roughly 18 to 20 inches of wall space above the light. This proportions the wall neatly, preventing the vanity area from feeling top-heavy or cluttered.
Bathrooms with nine-foot or ten-foot ceilings require a thoughtful approach to avoid leaving vast stretches of empty drywall above the vanity. In rooms with higher ceilings, you can choose a taller mirror to fill the vertical expanse while keeping the light mounted around 80 inches. Crown molding can also drop several inches down from the ceiling corner, reducing your usable wall height. Accounting for trim profiles before drilling ensures upward-facing lights do not cast harsh shadows across ceiling details.
Electrical Rough-In and Junction Box Placement
During a renovation or new build, electricians install the rough-in junction box before drywall and vanities are set in place. Securing the electrical box at the correct height requires knowing the exact specifications of your vanity cabinet, countertop thickness, and mirror dimensions beforehand. Standard vanity cabinets stand 32 to 36 inches high, and adding a quartz or granite countertop adds another inch or two. Calculating your light height without confirming countertop thickness can lead to a cramped layout once all finished surfaces are installed.
Centering your junction box precisely over the plumbing drain and sink basin is just as critical as getting the vertical elevation right. In some bathrooms, the vanity cabinet is centered along a wall, but the sink basin itself is offset to provide extra counter space. Always establish your vertical centerline directly over the sink faucet to keep your task lighting and reflection completely symmetrical. Always shut off power at the main electrical breaker panel before inspecting wires or connecting mounting plates, and hire a licensed electrician if you need to relocate the electrical box.
Width and Proportional Sizing of the Vanity Light
Height is only one component of proper vanity lighting placement; the width of your fixture also impacts how light falls across the vanity counter. As a general rule, an over-mirror fixture should measure approximately 70 to 80 percent of the mirror’s total width. A fixture that extends beyond the outer edges of the mirror looks top-heavy and can cast awkward peripheral shadows onto adjacent walls. Conversely, an undersized light bar centered over a wide mirror will concentrate brightness in a small pool, leaving the outer edges of the mirror dim.
For small 24-inch powder room vanities, compact fixtures like 14-inch or 16-inch bars fit neatly without overwhelming the space. Medium vanities measuring 30 to 36 inches pair nicely with 24-inch models, such as the YHTlaeh 23.6-inch LED fixture. Larger vanities spanning 48 inches or more can easily accommodate wider designs, including the VOLISUN 31.5-inch light bar, or multiple separate fixtures centered over individual basins. Matching fixture proportions to your mirror width ensures that light spreads evenly across your grooming station.
Managing Glare, Color Temperature, and Shadowing
Even a perfectly positioned vanity light can feel harsh if the bulbs produce an unflattering color temperature. Choosing light sources between 2700K and 4000K provides an inviting glow that renders skin tones accurately. Fixtures that offer selectable color temperatures, such as the VOLISUN 5CCT vanity bar, allow you to shift between warm white and cool daylight settings to match your preference. Learning about bulbs with natural color representation can help you choose light sources that render true skin tones without distorting colors during morning grooming.
Diffuser materials significantly influence how light hits your face when mounted above eye level. Clear glass shades, while visually striking in rustic and modern spaces, expose naked bulbs that can cause uncomfortable glare when viewed directly. Frosted acrylic shades or etched glass diffusers scatter the beam evenly, minimizing harsh contrast lines and softening shadows under your eyes. When using clear glass fixtures like the Ascher three-light sconce, pairing them with coated bulbs or frosted elements helps reduce direct retinal glare.
Installing a compatible dimmer switch adds tremendous versatility to your vanity lighting setup. Bright task lighting is indispensable when styling hair or applying cosmetics, but full brightness can feel overwhelming during middle-of-the-night bathroom visits. Modern dimmable fixtures allow smooth output adjustments from low ambient night lighting up to full daytime intensity. Make sure your dimmer switch matches the electrical specifications of your fixture, particularly when operating integrated LED drivers or specialized dimmable LED bulbs.
Environmental Ratings and Bathroom Moisture Considerations
Bathrooms generate substantial steam and airborne moisture that can quickly damage fixtures lacking appropriate protection ratings. Lighting fixtures installed directly above sinks or near shower enclosures should carry at least a damp-location rating or certified moisture protection like IP44. Metal components treated with electroplating and protective sealing resist corrosion, flaking, and rust over years of hot showers. Choosing fixtures constructed with sealed housing prevents moisture from penetrating internal wiring channels and shortening fixture lifespan.
Ventilation airflow also interacts with where your vanity lighting sits on the wall. Placing an unsealed light directly beneath a humid ceiling exhaust pathway increases condensation buildup on cool glass or metal surfaces. Routine cleaning with a dry microfiber cloth prevents mineral deposits from etching into acrylic diffusers or tarnishing electroplated finishes. Checking manufacturer specifications ensures the fixture you choose can withstand everyday humidity levels without failing prematurely.
Practical Verification Steps Before Securing Your Fixture
Before driving drywall screws or mounting backplates permanently, running a quick visual mock-up can save hours of frustration. Cut a piece of cardboard or craft paper to the exact width and height of your light fixture and tape it to the wall above your mirror. Step back to the bathroom doorway and examine the sightline to ensure the mock-up looks proportionate and centered. This simple visual test immediately reveals whether the fixture sits too close to the mirror frame or crowds the ceiling trim.
Once you are satisfied with the elevation and horizontal alignment, use a bubble level across the mounting plate before tightening terminal screws. Even a fractional tilt becomes glaringly obvious once a long horizontal light bar sits right above a perfectly level mirror frame. Double-check that all wire nuts are firmly fastened inside the junction box, and ensure ground wires are securely connected to the metal chassis. Taking these final verification steps guarantees your vanity light delivers reliable performance and enhances your bathroom for years to come.
Finding the right elevation for your bathroom vanity light comes down to balancing the standard 75 to 80-inch floor baseline with your mirror’s unique dimensions and ceiling height. Keeping a steady 1 to 5-inch clearance above the mirror frame preserves visual balance while preventing harsh shadows during daily grooming routines. Whether you select an adjustable LED bar or classic multi-light sconces, measuring carefully and testing sightlines before wiring ensures a comfortable, well-lit vanity space.




Write Your Review
No reviews yet. Be the first to share your experience!