


A dim cooking space makes meal preparation frustrating and creates harsh shadows right across your primary prep counters. Figuring out how to add light to kitchen spaces often begins with identifying where your existing illumination falls short, whether you struggle to read recipe cards or navigate shadowy prep surfaces. While primary ceiling boxes cast general light across the center of the room, they frequently leave the perimeter counters obscured beneath upper cabinets. Balancing your space requires integrating distinct layers of light rather than depending on a single overhead bulb.
Upgrading your cooking space does not always mean tearing into drywall or hiring an electrical contractor for extensive wiring. Modern lighting options span from hardwired flush-mount ceiling fixtures to plug-in bars and rechargeable magnetic strip lights that stick directly beneath shelving. If you are also considering accent illumination over a central island, exploring techniques for hanging pendant fixtures can show how drop height influences direct workspace visibility. By combining practical overhead illumination with targeted task fixtures, you can transform dark counters into bright, welcoming prep areas.


Practical Strategies for Kitchen Lighting Upgrades
Adding balanced light to a dark kitchen requires assessing how you move through the space during daily routines. Outdated lighting plans often rely on a single ceiling fixture that casts shadows directly over meal prep surfaces. Solving this problem involves layering distinct illumination sources to eliminate dark patches without generating uncomfortable glare. By combining ambient overhead upgrades, under-cabinet task bars, and pantry strip lights, you can create a bright, functional kitchen workspace.
Establishing the Three Core Lighting Layers
Successful kitchen illumination relies on ambient, task, and accent lighting working together. Ambient lighting supplies overall room illumination, allowing safe movement and access to upper cabinetry. Task lighting concentrates focused beams directly onto busy countertops, prep islands, and sinks. Accent lighting highlights architectural details or display shelves, bringing depth and balance to the entire cooking area.
Relying solely on one lighting type inevitably creates visual compromises. A single central ceiling fixture may illuminate the center floor, but your body blocks that light when facing perimeter counters. Installing targeted under-cabinet task fixtures immediately resolves this common shadow issue. Combining ambient and task sources ensures both overall visual comfort and crisp clarity for detailed chopping or cooking.
Upgrading Primary Overhead and Ambient Illumination
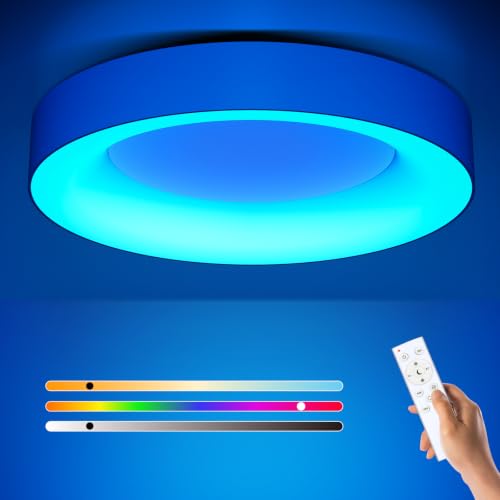
Central ceiling fixtures establish baseline illumination across the entire kitchen. Replacing an older enclosed glass dome with an open-frame metal flush mount, such as the SKEJAO Flush Mount Ceiling Light Fixture,Black, dramatically improves light distribution. Its open framework allows light to cast freely toward perimeter walls while adding a clean industrial design. Open cages also simplify maintenance because you never have to dismantle heavy glass covers to replace bulbs.
Socket compatibility is critical when selecting ceiling fixtures. Designs utilizing standard E26 bases support LED, CFL, or halogen bulbs up to sixty watts per socket. Choosing modern LED bulbs provides substantial lumen output while maintaining low energy consumption. When connected to a compatible wall dimmer, multi-socket fixtures offer flexible illumination levels for both busy family dinners and quiet late-night visits.
Targeted Task Illumination Under Upper Cabinets
Under-cabinet lighting offers the most practical way to eliminate dark shadows on food preparation counters. Placing fixtures beneath upper cabinets positions light directly over the working counter, preventing your hands from casting frustrating shadows. For kitchens with accessible backsplash outlets, plug-in light bars deliver continuous power without needing battery recharges. These fixtures provide dependable brightness that never fades during long cooking sessions.
High-output systems like the ASOKO Under Cabinet Lighting produce 1060 lumens across three linkable strips to illuminate wide counter runs. Built with aluminum housing for efficient heat dissipation, these bars carry an estimated service life of up to 30,000 hours. The system runs from a UL-listed twenty-four-volt adapter, promoting stable, flicker-free operation. Linkable bars can be connected end-to-end or joined with jumper cables to span across separated cabinets.
Simple operation is vital when preparing messy ingredients. The ASOKO light bar features dual sensor modes, letting you pick between dark-only activation and all-day motion sensing. Stepless dimming allows you to adjust brightness smoothly from gentle evening glow to vibrant daytime clarity. You can also customize auto-off delay timers from fifteen seconds to two minutes, matching your preferred kitchen work tempo.
Wireless and Rechargeable Lighting for Flexible Placement
Rental apartments and older kitchens without backsplash outlets benefit substantially from wireless under-cabinet fixtures. Modern rechargeable LED bars eliminate visible cord clutter while avoiding invasive wall cutting. Many models use magnetic mounts that snap directly onto iron surfaces or attach to non-metal cabinets with adhesive plates. When a light requires recharging, you simply detach the bar from its magnetic mount and connect a USB cable.
Battery size dictates how frequently you must recharge wireless light bars. The MCGOR 10inch Under Cabinet Lighting includes an 1800mAh rechargeable battery charged via Type-C connection, running up to eight hours continuously or several weeks in motion-sensor mode. It offers three distinct color temperatures and five brightness levels to suit various counter materials. Its magnetic back plate ensures fast, tool-free removal whenever the battery runs low.
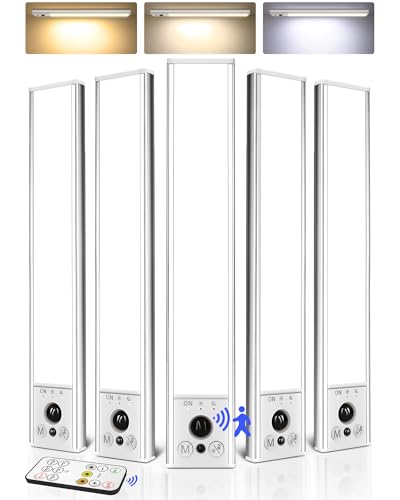
Large kitchens with multiple upper cabinets benefit from synchronized lighting controls. The EZVALO 5-Pack 10inch Under Cabinet Lighting addresses this need by linking five rechargeable bars to a single handheld remote. Each unit houses a 2400mAh battery for extended runtime between charges. Using the remote, you can fine-tune brightness from ten to one hundred percent, switch color temperatures, and manage timers across all cabinets at once.
Applying Flexible Light Strips to Dark Crevices and Pantries
Tight spaces and irregular contours often require lighting solutions that rigid bars cannot accommodate. Deep pantry shelves, toe-kick channels under base cabinets, and narrow spice cupboards benefit from flexible LED tape lights. These thin adhesive strips bend around corners and tuck neatly behind molding without protruding into usable storage. Their slim profile keeps the light source hidden while illuminating dark cabinet corners.
Compact options like the Amagle Motion Sensor Light Indoor feature a three-point-two-foot strip powered by four AAA batteries. Delivering 180 lumens at 4000K white light, the strip uses only 2.4 watts of power. It includes marked cut points along copper connectors, letting you trim the strip with scissors for smaller shelves. Strong adhesive tape secures the strip cleanly to wood, metal, or painted surfaces inside storage cupboards.
PIR motion sensing makes battery strips ideal for closed storage cabinets and walk-in pantries. The Amagle unit detects movement within three to five meters across a 120-degree angle. Opening the cabinet door activates the LEDs instantly, and the system shuts off after fifteen seconds of inactivity. This automated operation allows you to locate ingredients quickly without searching for a manual wall switch in the dark.
Understanding Color Temperature and Lumens for Food Prep
Choosing the correct color temperature is critical for both visual clarity and room ambiance. Measured on the Kelvin scale, lighting ranges from warm amber tones to crisp, cool daylight. Warm white lighting around 3000K produces an inviting, cozy atmosphere suitable for evening dining and entertaining. However, warmer light can reduce visual contrast when performing detailed food preparation on dark countertops.
Neutral white lighting between 4000K and 4500K provides an optimal setting for food preparation surfaces. Tones around 4500K daylight white, featured on the ASOKO system and selectable on EZVALO bars, mimic midday natural light. This neutral profile enhances contrast when chopping produce, reading recipes, and checking food doneness. Cooler settings reaching 6500K offer maximum brightness for detailed cleaning or intricate decorating tasks.
Lumens indicate actual light output, while wattage simply measures electrical draw. Countertop task areas typically need between 150 and 400 lumens per linear foot to overcome ambient overhead shadows. Dimmable fixtures allow you to dial output up for precision chopping and soften it for evening background lighting. High color rendering index ratings also ensure that food ingredients display their true, natural colors during preparation.
Choosing Between Motion Sensors, Remote Controls, and Manual Switches
The control method you select influences daily kitchen convenience and cleanliness. Standard manual wall switches provide steady operation, keeping lights on during extended cooking projects. However, touching switches with damp or food-covered hands can transfer bacteria and create frequent cleaning chores. Hands-free switching options maintain cleaner kitchen surfaces while speeding up everyday prep routines.
Passive infrared sensors detect motion and body heat, automatically turning lights on as you approach a counter. Dual-mode systems allow you to choose between night-only triggering and continuous all-day detection. Night modes conserve battery or electrical power by staying inactive during bright daylight hours. All-day modes ensure that deeply recessed counters remain well-illuminated even when natural window light fills the rest of the room.
Multi-light remotes provide centralized convenience when managing separated cabinet sections. Instead of reaching beneath each cabinet to toggle separate buttons, a remote controls every bar simultaneously. Built-in memory functions preserve your last-used brightness and color temperature choices each time the lights activate. Remote controls also make dimming simple when shifting from active meal preparation to a relaxed dining environment.
Mounting Methods and Surface Preparation
Secure mounting ensures your under-cabinet fixtures withstand daily cooking heat and cabinet door closures. Adhesive tape provides a tool-free installation method that protects expensive wood finishes. However, adhesive requires thorough surface preparation to prevent light bars or magnetic plates from releasing unexpectedly. Airborne grease, steam, and dust create slick films on cabinet undersides that weaken adhesive bonds over time.
Clean cabinet undersides with isopropyl alcohol and dry the area completely before mounting adhesive pads. When applying magnetic plates, press firmly for thirty seconds to activate the pressure-sensitive adhesive. Products like EZVALO recommend allowing adhesive plates to cure for twenty-four hours before mounting the magnetic light bars. This resting period ensures the adhesive bond reaches full holding strength before supporting the fixture weight.
Screw mounting provides a permanent, secure option for heavier plug-in fixtures like the aluminum ASOKO light bars. Measure your cabinet bottom shelf thickness before driving screws to avoid puncturing interior storage space. Drilling small pilot holes helps prevent dense cabinet hardwoods from cracking during screw placement. Positioning light bars directly behind lower cabinet trim shields the light source from seated eye level while aiming illumination across the counter.
Long-Term Maintenance and Electrical Safety
Regular maintenance preserves light output and extends the life of LED diodes and drivers. Cooking vapors and dust gradually form a thin film over lenses, reducing overall brightness over time. Wiping fixture diffusers periodically with a damp microfiber cloth prevents sticky grease buildup from hardening. If you also have decorative lighting in nearby dining spaces, learning methods for cleaning decorative fixtures ensures metal finishes remain protected without causing accidental water damage.
Electrical safety is paramount when adding fixtures near kitchen sinks, appliances, and water lines. Always verify that plug-in transformers carry recognized safety marks, such as UL certifications, to ensure proper thermal protection. When updating hardwired ceiling lights, shut off power at the main breaker before touching junction box wiring. If you encounter damaged wiring or lack a properly grounded ceiling box, hire a licensed electrician to handle the installation safely.
Periodic battery care keeps rechargeable light bars performing dependably over time. Recharging internal lithium batteries before they deplete completely helps maintain long-term cell capacity. Always use the manufacturer-supplied Type-C charging cables to ensure correct charging voltage and avoid damaging delicate internal circuitry. With proper mounting, thoughtful placement, and regular care, your upgraded kitchen lighting will provide bright, comfortable illumination across every counter and workspace.




Write Your Review
No reviews yet. Be the first to share your experience!