


Windowless corridors often feel cramped, gloomy, and unwelcoming because they lack daylight to diffuse harsh shadows across interior walls. Figuring out how to brighten a hallway with no natural light requires looking beyond a single dim ceiling bulb and planning a thoughtful combination of ambient brightness and reflective surfaces. When you replace an outdated central light with a higher-output fixture, the entire transition zone between bedrooms and living spaces immediately feels open and safe. Balanced illumination also prevents the tunnel effect that makes long, narrow passages feel like enclosed storage spaces rather than welcoming pathways.
Achieving comfortable visibility depends heavily on matching total fixture lumens to the floor area while selecting an appropriate color temperature. If your hallway ceilings have sufficient clearance, exploring our guide to hanging pendant fixtures can show how overhead drop height alters light spread along a narrow passage. Flush-mount fixtures and wall-washing techniques also help bounce illumination off painted drywall, brightening dark corners without creating distracting glare at eye level. By evaluating surface finishes, diffuser quality, and switch controls, you can transform any windowless corridor into a pleasant, well-lit walkway.

Pros
- Substantial 3600-lumen output per fixture brightens utility areas, kitchens, and larger bedrooms effectively
- Five selectable Kelvin options eliminate color-temperature guesswork prior to installation
- High CRI 90+ ensures natural color accuracy and eye-friendly, flicker-free light distribution
- Dual-ring metal frame offers a more durable and upscale build compared to basic all-plastic flush mounts
Cons
- Requires standard hardwired installation, which may require professional help if you are unfamiliar with home wiring
- Color temperature must be selected directly on the fixture switch rather than dynamically adjusted via a wall switch or app
- Lacks built-in smart features, requiring an external smart dimmer switch if automation is desired
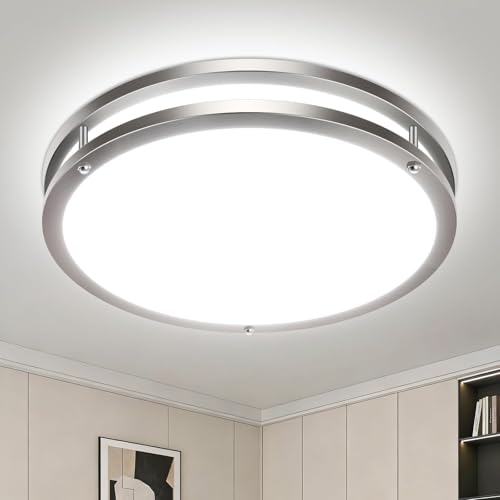
The weddeg 13-Inch Flush Mount LED Ceiling Light 2-Pack is an integrated LED fixture built to replace outdated dome fixtures and energy-draining incandescent lamps. Featuring an oil-rubbed bronze dual-ring metal trim, this set integrates smoothly into traditional, transitional, or farmhouse-inspired decor. The 2.6-inch low-profile height hugs close to the ceiling, making it a functional upgrade for standard eight-foot ceilings in bedrooms, kitchens, hallways, closets, laundry rooms, and home offices.
Real-world lighting performance centers on strong brightness and clean visual output. Each fixture delivers a manufacturer-rated 3600 lumens while drawing 36 watts of power, which provides significantly more light than typical 13-inch ceiling units. The onboard 5CCT switch gives you five options: warm white (2700K and 3000K), neutral white (4000K), and cool daylight (5000K and 6500K). Combined with a CRI 90+ rating, the fixture produces vibrant, accurate colors without muddy or washed-out tones, ensuring that wall paint, furniture, and kitchen counters look their best.
Build quality balances practical thermal dissipation with glare-reducing optics. The dual-ring metal frame conducts heat away from the internal LED diodes to promote component longevity, offering greater rigidity than thin plastic shells. Light passes through a thick plastic diffuser designed to eliminate visible hotspots and distribute illumination evenly across the room. When wired to a compatible standard wall dimmer, the light dims smoothly from 10% to 100%, allowing you to transition effortlessly between high-focus task lighting and softer evening ambient lighting.
Installation is straightforward for anyone comfortable with standard hardwired ceiling fixtures. Measuring 13 by 13 by 2.6 inches, the unit mounts flush against standard ceiling junction boxes using common mounting hardware. You simply select your preferred color temperature on the fixture switch during assembly, complete the wiring connections, and secure the trim. Having two matching fixtures in the box makes it easy to maintain visual consistency across adjacent spaces like an entryway and hallway.
There are a few practical limitations to keep in mind before purchase. Because the color temperature switch is located on the fixture itself, you cannot adjust the Kelvin setting from your wall switch or smartphone once installed without dismounting the cover. It is a traditional hardwired LED unit without native Wi-Fi, Bluetooth, or smart hub compatibility, so automated scheduling or voice control requires adding an external smart switch. Buyers should also note that the manufacturer listing mentions a 3-year warranty in one section and 5 years in another, so verifying exact terms upon arrival is recommended.
For homeowners, renters, and property managers seeking generous light output, classic bronze styling, and versatile color options, the weddeg 2-pack delivers dependable everyday value. It provides enough light for rooms up to 250 square feet while giving you the freedom to choose your preferred color warmth and light level.
Each fixture produces 3600 lumens at 36 watts, which provides substantial overall illumination for kitchens, home offices, and living spaces up to 250 square feet.
The integrated LED driver supports smooth dimming from 10% to 100% when connected to most standard wall dimmers, giving you full control over room brightness from morning prep to evening relaxation.
The fixture features a 5CCT selectable toggle offering 2700K warm white, 3000K soft white, 4000K neutral white, 5000K cool daylight, and 6500K daylight, allowing you to easily match your existing home lighting.
A CRI 90+ rating provides natural and balanced color rendering, helping fabrics, artwork, and interior finishes appear vibrant and accurate without harsh color distortion.
With a compact 13 by 13 by 2.6 inch footprint, this flush-mount fixture is designed for standard hardwired ceiling installation over existing junction boxes.
The low-profile design sits close to the ceiling to preserve overhead clearance in hallways, basements, and laundry rooms with standard ceiling heights.
Practical Strategies for Windowless Hallway Illumination
The primary solution for how to brighten a hallway with no natural light is installing high-output, diffused ambient ceiling fixtures spaced evenly to eliminate deep shadows. Because windowless passages receive zero daylight, relying on standard low-wattage accent bulbs leaves the perimeter walls dark and creates an uncomfortable cave effect. Pairing broad ceiling illumination with reflective interior finishes ensures that light spreads evenly across baseboards, doors, and walls. When you combine adequate lumen delivery with adjustable color temperatures, you establish a bright corridor that feels open, clean, and safe at any hour.
Calculating Hallway Lumen Requirements and Light Output
Determining proper illumination starts with measuring the corridor square footage and applying basic lumen guidelines for residential walkways. Hallways generally require between 10 and 20 foot-candles of light on the floor plane, which translates to roughly 100 to 200 lumens per linear foot of passage. A typical eight-foot by four-foot hallway covers thirty-two square feet and often struggles under older fixtures that generate fewer than 1,000 lumens. Supplying a windowless corridor with fixtures capable of delivering substantial output, such as 3,600 lumens across a paired installation, ensures uniform visibility across every doorway.
Excessive brightness without proper dispersion can create harsh glare on smooth flooring, so distributing output evenly remains critical. Splitting high lumen capacity across multiple light sources prevents the harsh central hotspot often produced by a single overpowering bulb. When light spreads horizontally toward the perimeter drywall, the vertical surfaces reflect illumination back into the walking path. This indirect bounce reduces the perception of darkness far more effectively than concentrating all available output into one localized spot.
Selecting the Right Color Temperature for Dark Corridors
Color temperature, measured on the Kelvin scale, fundamentally alters how your eyes perceive an enclosed interior space. Warm white settings around 2700K create an intimate, cozy atmosphere, but they can occasionally make windowless drywall look dingy or yellowed. Neutral white ranges between 3500K and 4000K closely mimic clean midday light, making them exceptionally well suited for dark halls with white or light gray paint. Cool daylight settings near 5000K or 6500K provide crisp visual acuity for tasks, though they may feel slightly clinical if adjacent living rooms use warm lighting.
Choosing fixtures with selectable color temperatures provides significant flexibility for homeowners unsure of which shade suits their interior finishes. Products like the 2-Pack Oil-Rubbed Bronze Flush Mount LED Ceiling feature five selectable settings spanning from 2700K up to 6500K, allowing you to fine-tune appearance during installation. If the corridor connects directly to a cozy living room, testing 3000K or 4000K helps you strike the right balance between warmth and crisp visibility. This adaptability prevents the common frustration of buying a fixed-color unit that clashes with nearby fixtures.
Fixture Types and Strategic Ceiling Spacing
Flush-mount and semi-flush fixtures remain the top practical choice for interior hallways with standard eight-foot ceilings. Low-profile designs maximize vertical headroom while casting wide beams that reach the upper edges of opposing walls. When positioning overhead units down a long passage, spacing them approximately six to eight feet apart creates overlapping light cones that prevent dim patches between fixtures. Hanging fixtures too far apart forces the eyes to continually adjust to alternating pools of brightness and shadow as you walk.
Compact corridors under ten feet in length usually require only one centered ceiling fixture, provided the luminaire offers broad distribution and high output. In longer corridors or L-shaped layouts, installing a matched set of two or more fixtures delivers visual consistency and balanced coverage. Using a matching two-pack simplifies electrical layout while ensuring that both ends of the hallway share identical trim finishes and light characteristics. Consistent fixture styling also creates clean architectural lines that visually elongate the entire hallway.
Controlling Glare and Maximizing Eye Comfort
Brightening an enclosed space should never come at the expense of visual comfort, especially when exiting a dimly lit bedroom at night. Bare bulbs or poorly shielded clear glass pendants can cast intense glare that causes temporary visual discomfort. Quality modern ceiling fixtures incorporate thick, frosted plastic or acrylic diffusers to scatter raw LED output smoothly in all directions. A well-engineered diffuser eliminates direct sightlines to intense LED chips while softening shadows along floorboards and baseboards.
Dual-ring metal frames and solid borders also help channel light outward toward the ceiling rather than focusing it solely downward. Fixtures engineered with durable metal housings help dissipate internal heat, which supports steady, flicker-free operation over extended lifespans. Minimizing flicker is essential in windowless areas because subtle strobing can cause eye fatigue and headaches during routine passage. High-grade LED driver boards ensure steady electrical current to maintain continuous, silent illumination.
The Role of High Color Rendering in Windowless Spaces
Color rendering index, or CRI, measures how accurately artificial light reveals the true colors of objects compared to natural sunlight. In hallways devoid of exterior windows, low-CRI lighting makes family photographs, wall art, and interior paint appear flat and desaturated. Selecting fixtures with a CRI rating of 90 or higher ensures that rich wall tones, wood trims, and decorative accents retain their natural vibrancy. High color accuracy transforms a utilitarian hall into an attractive, gallery-like extension of your home.
Elevated CRI also aids practical visibility when navigating storage closets, linen cabinets, or adjacent laundry alcoves located along the corridor. Distinguishing dark navy clothing from black fabric becomes much easier under high-fidelity lighting that reveals subtle undertones. The listed specifications for the 2-Pack Oil-Rubbed Bronze Flush Mount LED Ceiling indicate a CRI of 90+, providing vivid color representation across adjoining doorways. This optical quality elevates the overall atmosphere of the home without requiring complex accent spotlights.
Implementing Smooth Dimming for Day and Night Transitions
A windowless hallway demands different levels of illumination depending on the time of day and household activity. High output is ideal during morning routines, household chores, or moving items through the corridor when maximum visibility is beneficial. Late at night, however, full brightness can shock eyes that have adjusted to sleep, making soft low-level lighting far more desirable. Installing dimmable fixtures paired with compatible wall switches allows you to dial illumination down to comfortable navigation levels.
Fixtures designed for smooth dimming from ten percent up to one hundred percent provide precise control over ambient lumen levels. Before selecting a dimmer switch, verify that the wall control is rated for modern LED loads rather than legacy incandescent bulbs. Incompatible dimmer switches can trigger audible buzzing, intermittent blinking, or a restricted dimming range that shuts off prematurely. Reviewing manufacturer dimmer compatibility guides helps ensure smooth, silent transitions across all brightness levels.
Enhancing Vertical Surfaces with Paint, Mirrors, and Reflectance
Illumination does not end with the light fixture itself; the surrounding architectural surfaces play an enormous role in light transmission. Dark, matte wall paint absorbs substantial light energy, effectively negating the benefit of higher fixture lumens. Painting hallway walls in shades with a high Light Reflectance Value, such as soft off-white, warm cream, or pale greige, allows overhead beams to bounce across the passage. A satin or eggshell paint sheen also reflects more ambient light than a flat matte finish without introducing distracting glare.
Strategically hanging framed mirrors along a windowless wall is another proven tactic to multiply available illumination and expand visual depth. A mirror positioned across from an open doorway captures light from adjacent sunny rooms and reflects it directly down the corridor. Mirrors also break up continuous expanses of flat drywall, making narrow hallways feel significantly wider than their physical dimensions. Combining reflective wall elements with well-placed ceiling lights creates a brighter environment without requiring additional electrical lines.
Safe Installation Practices for Ceiling Fixtures
Replacing an existing hallway luminaire requires following safe electrical procedures to protect both the installer and the home electrical system. Always begin by switching off power at the main service panel and testing the circuit wires with a non-contact voltage tester before touching anything. Inspect the electrical junction box to confirm it is securely anchored to ceiling framing and rated to hold the weight of your new fixture. If you encounter frayed wiring, damaged wire nuts, or ungrounded metal boxes, consulting a licensed electrician is the safest course of action.
Mounting a modern flush-mount fixture typically involves securing a universal bracket to the junction box, connecting matching ground, neutral, and hot conductors, and fastening the canopy. Many integrated LED fixtures come equipped with quick-connect wire terminals or safety tether cables that support the fixture body during wiring. Ensuring all wire nuts are firmly twisted and wrapped with electrical tape prevents loose connections that could cause intermittent power loss. Once the base is fastened tight against the drywall, snap or twist the diffuser cover into place.
Maintenance, Cleaning, and Fixture Longevity
Over time, dust, airborne lint, and small insects can accumulate inside ceiling light diffusers, reducing total lumen output by as much as twenty percent. Regular cleaning preserves maximum brightness and keeps light distribution even and pleasant. Our practical guide on routine fixture cleaning techniques explains safe methods for removing built-up grime from residential light housings without scratching delicate surface coatings. Turning off the power switch and using a soft microfiber cloth slightly dampened with mild soapy water easily clears away accumulated debris.
Integrated LED ceiling lights eliminate the ongoing hassle of climbing a ladder to swap out burned-out incandescent or halogen bulbs. Because LEDs produce minimal forward heat and feature sealed electronic components, they deliver years of consistent operation under routine household use. Checking the mounting screws periodically ensures that thermal expansion and ceiling vibrations have not loosened the fixture canopy from the ceiling plane. Routine care guarantees that your corridor remains reliably illuminated year-round.
Essential Design Checklist for Windowless Corridor Lighting
Transforming a dark hallway into a bright, welcoming corridor requires coordinating fixture output, color temperature, optical diffusion, and surrounding wall finishes. Aim for at least 100 to 150 lumens per linear foot of hallway, and divide high lumen capacity across multiple fixtures if the passage exceeds ten feet. Choose neutral white color temperatures around 3500K to 4000K, or install multi-CCT selectable fixtures to balance brightness against warmth. High CRI ratings above 90 ensure that wall paint, artwork, and adjacent doors display accurate, vibrant tones.
Finally, pair your fixtures with compatible dimmer switches so you can smoothly lower illumination during quiet evening hours. Complement your overhead lighting layout with light-reflecting wall colors and well-placed mirrors to multiply ambient light across every narrow passage. By addressing both the source of the illumination and how surrounding surfaces receive it, any windowless interior hall can feel bright, open, and inviting throughout the entire day.





Write Your Review
No reviews yet. Be the first to share your experience!