


Upgrading bathroom illumination transforms daily grooming routines, improves morning visibility, and refreshes the overall ambiance of the space. Uneven shadows across the mirror often happen when an outdated overhead fixture fails to distribute illumination evenly around the sink. Learning how to install bathroom vanity light allows you to replace worn hardware, modernize your decor, and establish reliable task lighting tailored to your mirror setup. Whether you plan to mount a traditional multi-bulb sconce or an integrated modern light bar, proper electrical preparation and careful physical mounting remain critical. Handling these updates correctly ensures that your new lighting performs reliably in high-humidity areas.
Before removing old hardware or touching any wires, establishing a clear plan for your electrical connections and wall anchor points protects your drywall from unnecessary damage. Many of the same basic wiring safety principles used when hanging pendant lights overhead apply directly to mounting a wall sconce over a bathroom vanity. Understanding junction box compatibility, wire color coding, and shade orientation helps streamline the entire project. This guide walks through the required preparation, step-by-step installation practices, and practical safety checks needed to complete the project smoothly.


Step-by-Step Bathroom Vanity Light Installation Process
Installing a vanity light requires cutting power at the breaker panel, checking your electrical box, and connecting matching conductors. This project combines decorative hardware updates with basic electrical precautions to create reliable illumination above your mirror. Whether you are mounting a multi-socket sconce, an integrated LED bar, or adhesive mirror lights, following an orderly sequence prevents wiring errors and crooked fixtures.
Electrical Safety and Power Disconnection
Disconnecting electrical power at the main breaker box is essential before touching any wiring or removing existing fixtures. Simply switching off the wall toggle does not eliminate shock hazards because switch loops can still supply active voltage. Use a reliable non-contact voltage tester directly against the junction box conductors to confirm that zero current remains. Testing your voltage detector on an active circuit beforehand ensures the device operates accurately.
Place a folded towel or protective cloth over the bathroom sink basin and countertop before starting work. Porcelain surfaces scratch easily from dropped tools, and open drains can quickly swallow small mounting screws or wire nuts. Clearing toiletries provides ample space for a step stool so you can work comfortably at eye level. Good workspace preparation keeps your mechanical hardware organized and prevents accidental plumbing damage.
Removing the Old Fixture and Inspecting the Electrical Box
Remove the old vanity light by unscrewing the decorative nuts holding the canopy against the wall plate. Gently pull the fixture body away from the wall to access the wire connections inside the junction box. Untwist the plastic wire connectors, separate the conductors, and safely lift the old lighting unit down. Inspect the electrical box to confirm it remains anchored firmly to a wall stud or approved drywall support bracket.
Bathroom vanity fixtures place horizontal leverage on an electrical enclosure, requiring solid wall support. Standard round or octagonal metal and plastic boxes must bear the full weight of the fixture and shades. Modern fixtures like the Joossnwell LED Bathroom Vanity Lighting Fixture feature a square 4.72-inch base designed to cover standard US junction boxes cleanly. If your wall has an unanchored opening or loose wiring, install an approved remodel junction box before mounting new hardware.
Setting Up the Universal Mounting Bracket
Most vanity fixtures utilize a universal crossbar that screws directly into the junction box mounting ears. Thread the fixture mounting studs through the crossbar before securing the plate to the electrical box. Adjust the depth of these threaded posts so they extend far enough to receive the decorative finishing nuts. Check horizontal alignment with a small torpedo level across the crossbar before tightening the box screws down firmly.
Certain mounting plates allow slight horizontal adjustments if your mirror is off-center from the wall junction box. Route household wires through the center opening of the crossbar carefully to prevent pinching conductor insulation against metal edges. The green grounding screw must face outward into the room so the grounding wire loops beneath it cleanly. Ensuring the mounting plate sits flat against finished drywall stops the fixture from wobbling.
Connecting Hot, Neutral, and Equipment Ground Wires
Standard residential lighting operates on 120-volt current, requiring connections for hot, neutral, and ground conductors. Strip three-quarters of an inch of clean copper insulation from each wire if the exposed ends look frayed. Connect the black household supply wire to the black or smooth fixture lead using an appropriately sized wire nut. Twist the connector clockwise until snug, then pull each wire gently to ensure a secure splice.
Join the white neutral house wire to the white or ribbed neutral wire coming from your light fixture. The neutral conductor completes the electrical pathway, returning current safely to the service panel during normal operation. Twisting these wires firmly inside a plastic wire connector maintains stable contact and prevents electrical arcing. Avoid leaving exposed copper outside the base of the plastic connector once the splice is complete.
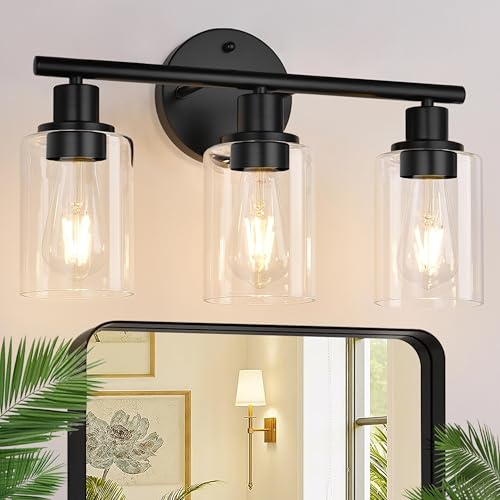
Grounding diverts stray current safely away from exposed metal components in the event of an electrical fault. Connect the household bare copper ground wire to the fixture ground lead and loop it around the green ground screw. Metal fixtures like the Zarbitta 3-Light Bathroom Light Fixtures feature an all-metal chassis that requires thorough grounding for user safety. Fold the connected wires in an accordion pattern and gently tuck them back into the electrical junction box.
Securing the Canopy and Aligning the Hardware
Fit the mounting holes on the fixture canopy over the threaded studs on the universal wall plate. Push the canopy flat against the wall, taking care not to pinch any internal conductors against the metal rim. Thread the decorative cap nuts onto the studs by hand to avoid damaging delicate metal threads. Check the horizontal level of the fixture arm before tightening the cap nuts down snugly.
Avoid over-tightening decorative nuts against the canopy, as excessive pressure can dent thin metal or crush drywall. If you see a gap between the canopy and an uneven wall, verify that wires are not bunching behind the plate. Bathrooms experience frequent steam and moisture, making a tight canopy fit important for protecting internal wiring. Running a thin bead of paintable acrylic caulk along the top canopy edge helps seal out bathroom humidity.
Installing Glass Shades, Sockets, and Compatible Bulbs
Once the canopy is secure, attach the decorative glass shades and light bulbs to each socket. Traditional multi-light designs use threaded socket rings to clamp glass shades onto the fixture body. Fixtures built with UL-certified ceramic E26 sockets, such as the Zarbitta 3-Light model, handle long-term bulb heat effectively. Hand-tighten the shade rings carefully without tools to avoid cracking the clear glass shades, then screw in compatible bulbs.
Choosing the right bulb style and wattage directly impacts mirror visibility and comfort during grooming tasks. Clear glass shades pair nicely with vintage filament LED bulbs, whereas frosted shades diffuse light more evenly across your face. Integrated LED models like the Joossnwell modern wall sconce feature built-in 12W illumination, removing the need for separate bulbs. Always respect the maximum wattage limits stamped on socket labels to prevent heat-related wiring damage.
Evaluating Upward Versus Downward Mounting Orientation
Reversible multi-light fixtures allow you to position the shades pointing either upward toward the ceiling or downward toward the sink. Pointing shades downward provides direct task illumination over the vanity counter, eliminating dark shadows under the eyes and chin. This downward orientation helps maximize brightness around the mirror for daily shaving or cosmetics application. Keep in mind that exposed downward bulbs can produce glare, making frosted or diffused bulbs a smart choice.
Mounting shades upward directs light toward the ceiling to produce a soft ambient glow across the room. Upward lighting works well in bathrooms with light-colored ceilings that reflect illumination evenly into the space. This orientation also protects glass shades from sink water splashes, keeping the glassware cleaner between routine washings. Verify clearance between the top of your mirror and any overhead cabinets before selecting your final mounting direction.
Installing Adhesive Mirror Strips and Plug-In Alternatives
Not every bathroom layout allows for cutting drywall or installing hardwired wall junction boxes. Renters and homeowners with unlit mirrors often choose peel-and-stick LED kits for rapid task lighting. Kits like the Led Vanity Mirror Lights Kit from ViLSOM include a 13-foot strip with 240 LEDs that adheres directly to mirror borders. These low-voltage 12V strips plug into standard wall outlets, offering adjustable brightness without requiring any electrical box modifications.
Clean the mirror glass or frame perimeter thoroughly with rubbing alcohol before pressing adhesive strips into place. Removing soap scum and moisture ensures the double-sided tape forms a strong bond that resists bathroom humidity. Many flexible LED strips are cuttable every three LEDs, allowing you to tailor the length to your exact mirror dimensions. Route the thin power cord safely to a GFCI-protected outlet while keeping excess wiring tidy and dry.
Selecting Suitable Color Temperature and Brightness
Color temperature determines how warm or cool your vanity illumination appears in the bathroom mirror. Warm white lighting around 2700K produces a cozy ambiance but can introduce yellowish tints that alter cosmetic tones. Neutral white light around 4000K, provided by fixtures like the Joossnwell LED vanity bar, offers balanced, natural visibility. Daylight settings near 6000K replicate bright morning sun, making fine grooming details easier to distinguish during daily routines.
Balancing total brightness across your vanity helps prevent eye strain while delivering sufficient task visibility. Fixtures that are too dim leave frustrating shadows, while excessive brightness through clear shades causes harsh glare. Pairing an overhead vanity light with side sconces or mirror strip illumination creates even cross-illumination. Selecting compatible color temperatures across your bathroom fixtures maintains a cohesive, comfortable atmosphere throughout the entire room.
Post-Installation Testing and Routine Care
Turn the circuit breaker back on after all hardware, shades, and bulbs are fully assembled. Test the wall switch to verify that all lights illuminate smoothly without buzzing or intermittent flickering. If the light fails to turn on, switch off the breaker immediately before checking socket seating or wire splices. Applying established methods for cleaning decorative light fixtures helps protect metal finishes from moisture-related bathroom tarnish over time.
Always shut off power and let bulbs cool down before dusting fixture arms or wiping glass shades. Use a soft microfiber cloth rather than harsh household chemicals that can erode protective metal coatings or seep into sockets. Check the mounting hardware and canopy fit annually to ensure high bathroom humidity has not loosened wall fasteners. Proper installation and routine care ensure your new vanity light delivers safe, flattering illumination for years to come.




Write Your Review
No reviews yet. Be the first to share your experience!