


A malfunctioning lamp or dark ceiling fixture does not always mean the entire luminaire belongs in the trash. In many cases, repeated heat degradation, loose terminal screws, or worn contact points inside the threaded socket prevent electricity from reaching the bulb. Learning how to replace a light fixture socket allows you to restore reliable illumination without the expense of buying an entirely new lighting unit. Working with basic electrical components requires patience, but understanding how sockets function makes the repair manageable for most homeowners. Bringing in supplemental illumination such as portable work lights can keep your work area clearly visible while the main circuit is switched off.
Fixing an existing light fixture also gives you a chance to upgrade older hardware to more resilient materials. Modern replacement sockets often feature high-heat ceramic bodies, reinforced phenolic plastic shells, or pre-attached wire leads that simplify your wiring tasks. Before picking up a screwdriver, you need to identify the exact base size, the mounting style, and the proper wire connections required by your specific lamp. Following basic safety precautions and matching the right electrical specifications ensures your repaired fixture operates safely for years. Taking a systematic approach protects your household wiring and restores proper light to your living space.




Practical Guide to Replacing a Light Fixture Socket
Replacing a light socket involves disconnecting power, removing the damaged part, mounting compatible hardware, and wiring with correct polarity. Most fixtures use standard medium screw bases, though mounting methods vary between table lamps, pendants, and ceiling luminaires. Understanding these mechanical and electrical requirements beforehand ensures a durable, secure repair.
Recognizing When a Light Fixture Socket Needs Replacement
Electrical sockets endure significant thermal stress as light bulbs heat up and cool down during daily operation. Continuous thermal expansion can cause plastic housings to turn brittle, crack, or release a scorched odor. If you notice discoloration around the threaded collar or charring near the base, the socket has reached the end of its safe life. Continuing to run electricity through scorched components increases the risk of fixture failure.
Mechanical wear also contributes to socket failure, especially in lamps where bulbs are changed frequently. The small metal tab at the bottom of the socket, known as the center hot contact, can become flattened and lose contact with the bulb. When this contact flattens, the light may flicker intermittently or fail to turn on unless the bulb is overtightened. Overtightening can strip the threads or crack the interior insulator, requiring a complete replacement.
Corrosion presents another common issue, particularly in damp basements, covered porches, or unconditioned garages. Moisture reacts with brass or aluminum screw shells, creating oxidized deposits that resist electrical flow and generate excess heat. When oxidation coats the interior threads, bulbs may bind tightly and shatter during removal attempts. Swapping out a corroded socket eliminates electrical resistance and prevents damaged bulbs from sticking.
Essential Safety Precautions and Circuit Isolation
Working on any electrical luminaire requires absolute confirmation that no voltage flows to the fixture. For hardwired ceiling fixtures or wall sconces, switch off the dedicated circuit breaker at the main electrical panel. Simply flipping off a wall switch does not guarantee safety, as switch loops can leave live voltage inside the ceiling box. Portable floor or table lamps must be unplugged completely from the wall receptacle before beginning work.
Testing the wires with a reliable non-contact voltage tester provides an essential secondary safety check. Touch the tester tip to the wire leads and interior socket shell to confirm the absence of electrical current. If you must work in a darkened room, set up battery-operated lamps to maintain clear visibility. If you use automated scheduling devices such as indoor lighting timers, ensure they are disconnected from the circuit during repairs.
Organizing your workspace prevents small fasteners and mounting hardware from getting misplaced during disassembly. Place a soft towel beneath table lamps to avoid scratching decorative finishes, and keep small containers nearby for screws and lock washers. Never perform electrical repairs with wet hands, and avoid standing on damp floors without rubber-soled shoes. Establishing a safe, well-lit environment prevents accidents and allows you to focus on proper assembly.
Identifying Socket Types and Base Specifications
Standard residential lighting in North America predominantly uses the E26 medium screw base, which features an approximate 26-millimeter diameter. While the base size is standard, the physical construction must match the thermal and mechanical demands of the luminaire. Ceramic sockets, such as the RTNLIT Ceramic E26 Light Socket with 10″ Wire, provide exceptional heat dissipation and flame resistance. These heavy-duty ceramic models handle higher ratings, frequently up to 250V and 660W, making them suitable for enclosed fixtures and high-temperature environments.
Table lamps, floor lamps, and decorative pendants frequently rely on keyless or keyed phenolic sockets. Phenolic plastic shells, like the Keyless Socket Replacement with Shade Ring, are lightweight, corrosion-resistant, and commonly rated up to 250V and 250W. Keyless sockets lack an integrated on-off switch, making them ideal for fixtures controlled by wall switches or cord switches. These models often incorporate threaded outer rings that secure lamp shades firmly against the socket body.
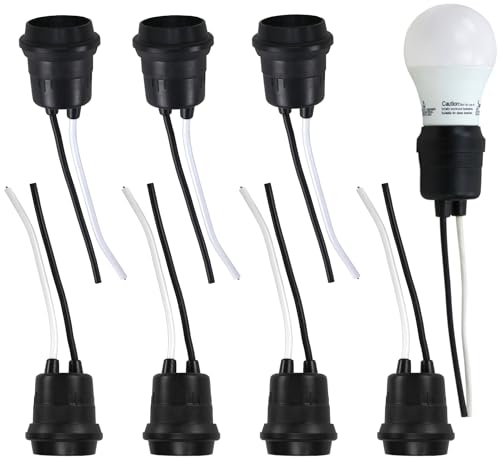
Outdoor, temporary, or industrial utility fixtures often require weatherproof pigtail sockets constructed from heavy-duty plastic or rubberized compounds. The Harrier Hardware Weatherproof E26 Pigtail Lamp features pre-attached 6-inch wire leads designed to splice directly into junction boxes while resisting moisture. Checking the wattage rating, voltage limit, and physical dimensions of your existing socket ensures that the replacement fits properly without crowding wires. Installing a socket with inadequate thermal ratings creates a serious safety hazard.
Tools and Supplies Needed for the Project
Gathering the proper electrical hand tools before disassembling the fixture streamlines the entire replacement process. You will need a standard slotted screwdriver, a Phillips screwdriver, wire strippers matching your wire gauge, and needle-nose pliers for shaping wire loops. A quality non-contact voltage tester is essential for verifying circuit isolation before touching bare conductors. Having basic supplies on hand, such as twist-on wire nuts and electrical tape, guarantees secure, insulated wire splices.
Check the mounting hardware that comes with your replacement socket to see if extra fasteners are required. Many replacement kits, including ceramic options with pre-wired 18AWG leads, include mounting nipples, lock nuts, insulating fiberboard discs, and female threaded brackets. If you are rewiring a table lamp, examine the cord to ensure the copper strands are flexible and free of cracked insulation. Having all necessary parts laid out on your workbench saves time and eliminates frustrating interruptions.
Step-by-Step Socket Replacement Procedure
Begin by removing the light bulb, decorative shades, finials, or glass diffusers from the fixture to prevent accidental breakage. For a ceiling fixture, loosen the canopy mounting screws and carefully lower the fixture base to expose the electrical box. For a table lamp, gently press the metal shell near the bottom socket cap where the word press is stamped, then rock the shell upward. Take your time during this step to avoid bending decorative metal sleeves or snapping plastic clips.
Document the existing wire arrangement with a quick photo before detaching any connections. On screw-terminal sockets, loosen the brass and silver terminal screws with a screwdriver and unhook the copper wires. If the fixture uses pre-wired pigtail leads connected with wire nuts, unscrew the plastic connectors and untwist the splices. Inspect the exposed copper tips; if strands appear frayed or brittle, snip off the damaged ends and strip back half an inch of fresh insulation.
Remove the old socket from its mounting hardware by unthreading the lock nut or unscrewing the central threaded pipe nipple. Fit the new replacement socket onto the existing bracket or threaded rod, making sure to install any included insulated fiberboard washers. These fiberboard discs act as essential thermal and electrical barriers, preventing the terminals from contacting grounded metal fixture bodies. Thread the lock nuts tightly so the socket remains completely stationary when bulbs are turned.
Attach the electrical wires securely according to the socket design. If using a pre-wired replacement with flexible lead wires, twist the fixture leads together with the household wires and twist on appropriately sized wire nuts. For sockets with screw terminals, bend the solid copper wire into a clockwise hook and wrap it around the terminal screw before tightening firmly. Ensure that no stray wire strands poke out from beneath the screw head where they could cause shorts.
Reassemble the fixture housing, taking care not to pinch any wires between metal components. For lamps with two-piece phenolic or brass shells, slide the outer sleeve over the socket interior until it snaps firmly into the bottom cap. If your socket features a threaded shade ring, position the lamp shade over the socket collar and screw the ring clockwise until snug. When retrofitting fixtures in workshops or garages, evaluating fluorescent tube output considerations can help determine whether updating sockets or replacing fixtures suits your lighting needs.
Ensuring Proper Electrical Polarity and Strain Relief
Maintaining correct electrical polarity is the most critical safety factor when wiring a light socket. Household alternating current systems utilize a hot wire that carries voltage and a neutral wire that completes the electrical circuit back to the panel. The hot wire, which typically features black insulation or a smooth outer jacket on lamp cords, must connect to the brass screw terminal or center contact lead. The neutral wire, identified by white insulation or ribbed texture, connects to the silver screw terminal or outer threaded shell.
Reversing polarity creates a severe shock hazard for anyone changing a light bulb in the future. When polarity is wired correctly, only the tiny contact tab deep inside the socket remains energized when the switch is on. If polarity is reversed, the entire threaded screw shell becomes energized with live electricity. Under reversed polarity conditions, simply touching the metal threads of a partially unscrewed bulb can deliver a dangerous electrical shock.
Mechanical strain relief protects internal wire connections from being pulled loose when cords are tugged or lamps are moved. When assembling table lamps or hanging pendant sockets, electricians tie an underwriter knot in the two cord conductors before connecting them to terminal screws. This specific knot sits snugly inside the socket base cap, absorbing mechanical tension so the electrical screws do not bear physical weight. Sockets like the Keyless Socket Replacement with Shade Ring also include threaded cable grips that lock the cord securely.
Exploring Socket Adapters and Multi-Outlet Alternatives
Sometimes homeowners wish to expand the utility of an existing light fixture rather than merely restoring a single bulb connection. Screw-in socket adapters convert a standard E26 light socket into auxiliary electrical receptacles or multi-bulb configurations. Units like the EMNOOTI 2-Pack E26 Light Socket Adapter incorporate two electrical outlets alongside a built-in pull chain switch, allowing independent control over the light bulb. These adapters provide a convenient way to power holiday lighting, security cameras, or utility tools in spaces lacking wall receptacles.
When considering outlet socket adapters, you must pay close attention to material quality and maximum electrical ratings. Adapters constructed from flame-retardant urea resin or PBT plastic, such as the EMNOOTI Outlet Light Socket Adapter,Screw in Outlet, resist high operating temperatures and reduce heat release. While these adapters can handle power ratings between 660W and 1250W across their outlet receptacles, bulb sockets on adapter bodies often carry lower limits, such as 60W or 250W. Exceeding these rated limits with high-wattage bulbs can overheat the adapter and degrade socket contacts.
Grounding capability represents another key factor when selecting adapter units for home use. Simple two-prong adapters cannot safely accept three-prong grounded appliance plugs without creating safety hazards. Multi-outlet converters, such as the eRqILUJI 2 Pack, Light Socket to Plug Adapter, feature pure copper internal contact sheets and three-prong outlets compatible with polarized and grounded equipment. However, remember that screwing an adapter into an ungrounded light fixture does not create a true earth ground path. Heavy power tools or sensitive electronics should always connect to properly grounded wall receptacles.
Troubleshooting Common Post-Installation Faults
Once your replacement socket is fully assembled and mounted, test the installation before replacing decorative trim or ladder equipment. Restore power at the service panel breaker or plug the lamp cord into the wall receptacle, then turn on the fixture switch. If the new bulb illuminates immediately with steady, flicker-free light, the repair has been executed properly. Let the light run for several minutes while observing the fixture to ensure there is no buzzing or burning odor.
If the bulb fails to illuminate, turn off the power at the breaker immediately before investigating potential assembly errors. A common culprit is a center brass contact tab that sits pressed too flat against the porcelain or plastic insulator base. With the power completely disconnected, take a small wooden stick or insulated screwdriver to gently pry the brass tab upward by roughly one-sixteenth of an inch. This slight adjustment restores positive physical tension against the bulb contact point when screwed back into place.
A tripped circuit breaker immediately upon restoring power indicates a dead short inside the fixture housing. This issue usually stems from a stray wire strand touching the metal fixture body or the hot and neutral terminals touching each other. Disassemble the housing to inspect the wire splices, verify that terminal screws are tightly clamped, and ensure insulated fiberboard covers remain properly positioned. If circuit breakers continue to trip or if you encounter damaged household wiring, stop work and consult a licensed electrician.
Replacing a worn light fixture socket restores safe and dependable illumination to your home while avoiding the unnecessary cost of replacing entire luminaires. By choosing high-quality replacement parts with suitable thermal ratings, observing proper wire polarity, and taking time to verify electrical connections, you can complete the repair with confidence. A well-installed socket ensures your lighting fixtures operate reliably and safely for many seasons to come.




Write Your Review
No reviews yet. Be the first to share your experience!