


Long corridors, narrow passageways, and entry corridors often suffer from uneven shadows and poor ambient visibility. Choosing the right layout for how to light a hallway requires balancing overhead ambient illumination with targeted pathway accents so family members can navigate safely at any hour. Hardwired ceiling mount fixtures provide consistent general light, but high-traffic zones also benefit from lower glare alternatives. Integrating subtle illumination along baseboards or under console tables helps eliminate dark corners without overwhelming the transitional architecture of your home.
Many homeowners struggle with choosing between hardwired ceiling units, plug-in wall fixtures, and battery-operated accent strips. In spaces with tall ceilings, exploring techniques for hanging decorative pendant lights can offer inspiration for vertical balance, while low ceilings demand flush or semi-flush profiles. Matching your hallway dimensions with proper lumen output and color temperature ensures that the corridor feels warm, open, and functional rather than like an uninviting tunnel. Paying attention to switch placement and smart sensing controls further improves everyday convenience across shared living areas.



Lighting a hallway properly requires moving beyond the idea that a single ceiling bulb can handle the entire corridor. Hallways serve as primary circulation paths that link busy daytime areas with restful evening quarters, making adaptable illumination essential. An effective plan combines reliable overhead visibility with subtle pathway guidance so family members and guests can move comfortably without experiencing intense glare. By evaluating dimensions, traffic flow, and practical fixture styles, you can transform a neglected pass-through into an inviting architectural feature.
Every corridor presents unique architectural quirks such as narrow clearances, multiple doorway openings, or an absence of natural windows. Addressing these physical characteristics requires layering multiple light sources rather than relying on one intense fixture in the center of the ceiling. Overhead ambient units establish general room awareness, while secondary accent sources and low-level safety units highlight steps and floor boundaries. Balancing these layers helps maintain steady visual comfort as you transition between bright living rooms and quieter spaces.
Determining Proper Lumen Output and Balanced Brightness
Calculating the appropriate brightness for a corridor starts with measuring the square footage of the walking area. Most residential hallways require roughly ten to twenty lumens per square foot to support safe navigation without creating harsh glare. For example, a hallway measuring eight feet long by four feet wide totals thirty-two square feet and generally functions best with three hundred to six hundred total lumens of ambient light. Windowless interior halls may benefit from approaching the higher end of that range to compensate for the total lack of natural daylight.
Excessive brightness in an enclosed passage quickly creates uncomfortable reflections on polished floors and painted walls. Conversely, insufficient light produces shadowy blind spots around door frames and increases the risk of tripping over stray shoes or pet toys. Diffused light sources with frosted shades or wide beam angles distribute output evenly across the entire corridor width. Spreading that illumination across multiple moderate-output sources always produces a more pleasant visual experience than concentrating extreme brightness into one glaring bulb.
Selecting Fixture Styles Based on Ceiling Height and Hallway Width
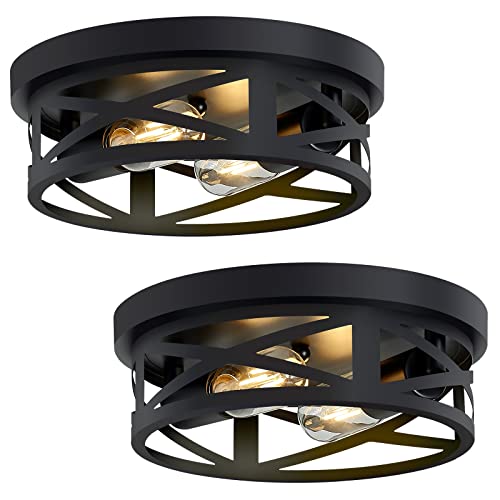
Vertical clearance is the most critical measurement when choosing overhead fixtures for any home corridor. Standard eight-foot ceilings generally require flush mount or ultra-low-profile fixtures to preserve ample head room for tall occupants and moving furniture. Fixtures like the SKEJAO Flush Mount Ceiling Light Fixture,3-Light offer a thirteen-inch wide metal cage design that sits tight against the ceiling surface. Its multi-socket configuration allows homeowners to install three separate E26 base bulbs, making it simple to calibrate overall illumination while keeping the fixture clear of walking paths.
Homes with ceilings measuring nine feet or higher can comfortably accommodate semi-flush mount fixtures or even decorative pendants. In narrower corridors, protruding wall sconces can become physical obstacles unless they meet standard architectural projection guidelines. Sconces should generally project less than four inches from the wall surface when mounted below eighty inches from the finished floor. If your hallway width is under forty inches, keeping the primary light fixtures on the ceiling preserves valuable lateral clearance.
Open cage designs and transparent glass shades provide maximum light dispersion but require careful bulb selection to prevent direct visual glare. Choosing milky white or frosted LED bulbs inside open metal frames softens the point source while preserving strong ambient spread. Fixtures featuring sturdy iron construction and protective matte finishes also resist dust accumulation in high-draft areas. Matching fixture proportions to hallway width ensures the hardware looks intentional rather than cramped or oversized.
Spacing and Positioning Overhead Fixtures to Prevent Shadows
Consistent fixture spacing is necessary to eliminate the alternating bright and dark patches known as the zebra effect. In typical residential hallways, overhead lights should be spaced approximately eight to ten feet apart along the center line of the ceiling. Placing fixtures too far apart leaves dark gaps where shadows gather between light pools, diminishing overall spatial comfort. You should also position a light fixture approximately two to three feet from each end wall so door thresholds remain clearly illuminated.
Architectural obstructions like attic hatches, HVAC supply vents, or smoke detectors can disrupt ideal linear spacing. When obstacles arise, shifting fixtures slightly off center or adjusting the beam angle can maintain balanced illumination across the floor. Long corridors that bend around corners require dedicated fixtures on both legs of the turn to maintain continuous line-of-sight awareness. Ensuring consistent light levels across the full length of the walkway gives the space a cohesive and open architectural feel.
Utilizing Wireless and Motion-Sensing Lights for Midnight Navigation
Full overhead illumination is frequently too harsh when waking up for a midnight glass of water or checking on children. Motion-activated fixtures resolve this issue by providing immediate low-level lighting that turns on automatically as you approach. The MCGOR 10inch Under Cabinet Lighting bar uses passive infrared detection to monitor a ten-foot arc across one hundred and twenty degrees, turning on upon sensing movement and shutting off after twenty seconds of stillness. Features like an internal eighteen-hundred milliamp-hour rechargeable battery and Type-C charging make wire-free installation straightforward in any hallway section.
Smaller puck lights provide focused spot illumination where slim light bars might look too prominent. The Searik 3 Pcs Motion Sensor Light Indoor units operate on standard AAA batteries and supply approximately twenty lumens of soft illumination, perfect for subtle floor-level guidance. These compact units utilize magnetic adhesive pads, allowing you to peel and stick the mounting base directly to baseboards or cabinet ends. Because they only activate when darkness and motion coincide, battery consumption remains low during standard daylight hours.
Wireless sensor lights give renters and budget-conscious homeowners flexible safety lighting without the expense of opening drywall. Because magnetic backings release effortlessly, units can be pulled down quickly for battery replacement or periodic recharging. You can also dismount these portable bars during electrical power outages to serve as handheld emergency flashlights. Placing sensor lights near floor transitions, single steps, or bathroom entryways significantly improves nighttime safety for every member of the household.
Baseboard, Step, and Low-Level Perimeter Placement
Mounting low-level lights near the floor surface delivers functional illumination directly where feet touch down. Positioning stick-on magnetic lamps six to twelve inches above the floor prevents the light beam from shining directly into the eyes of walking occupants. This downward orientation keeps floor clutter visible while maintaining a relaxing, low-stimulus environment throughout sleeping corridors. It also provides immediate visual orientation for visiting guests who may not be familiar with your interior room layout.
Staircases and subtle elevation changes within a hallway demand particular attention to low-level fixture placement. Installing a small motion-sensing light on the riser or side stringer of a staircase prevents missteps in dimly lit conditions. Before mounting adhesive metal plates onto painted trim, cleaning the surface with isopropyl alcohol ensures reliable adhesion over long periods. Keeping these lower accents aligned in a neat horizontal sequence maintains an orderly aesthetic along the entire baseboard run.
Managing Color Temperature and Visual Consistency Across Corridors
Light color temperature drastically influences how spacious, warm, or sterile a residential hallway feels. Measured in kelvins, color temperatures around twenty-seven hundred kelvins produce a warm, golden glow reminiscent of traditional incandescent bulbs. Neutral white light between three thousand and thirty-five hundred kelvins offers a crisp, clean appearance that renders paint colors accurately without appearing cold. Selecting an adjustable fixture like the MCGOR light bar lets you toggle between warm, natural, and white settings to match adjoining living spaces.
Abrupt shifts in color temperature between adjoining rooms can strain the eyes and make a home feel disjointed. If your open-concept living area uses warm twenty-seven hundred kelvin lighting, installing cool five-thousand kelvin bulbs in the hallway creates an uninviting institutional contrast. Maintaining a consistent color temperature across transitional hallways ties different zones together smoothly. For maximum aesthetic harmony, select bulbs with a high color rendering index so wall art and architectural finishes look vibrant and true to life.
Switch Configurations, Dimmers, and Smart Controls
Convenient switch placement is just as essential as the physical placement of your hallway light fixtures. Every long corridor should feature three-way switches positioned at both entrance points so you never have to walk through the dark to find a wall control. Adding a dimmer switch to hardwired overhead fixtures provides valuable control over daytime brightness versus evening ambience. Multi-bulb flush mounts like the SKEJAO ceiling fixture support dimming seamlessly when paired with compatible dimmable E26 LED bulbs and a standard wall dimmer.
Smart lighting controls offer automated scheduling that adjusts hallway light levels based on the time of day. You can program smart switches to illuminate overhead fixtures at full output during busy morning routines and automatically lower brightness to twenty percent after ten in the evening. Motion-activated smart switches installed in wall boxes can replace manual toggling altogether in high-traffic laundry or mudroom halls. Choosing flexible control methods ensures your hallway lighting responds effortlessly to daily household routines.
Fixture Upkeep and Routine Hardware Maintenance
Hallway fixtures collect substantial amounts of dust, lint, and airborne debris due to continuous air circulation between rooms. Open-frame metal lights and exposed bulb enclosures require periodic wiping with a dry microfiber cloth to keep light output bright and clean. When handling high-end decorative finishes, our practical guide to cleaning classic light fixtures offers helpful methods for preserving protective surface coatings without relying on harsh household chemicals. Always ensure the circuit switch is turned off before cleaning any hardwired ceiling fixture.
Battery-powered sensor fixtures also benefit from regular maintenance routines every few months. Dust gathering across passive infrared sensor windows can diminish movement sensitivity, causing delayed activation or missed detections. Wiping the lens gently with a soft cotton swab restores optimal sensor range and wide-angle responsiveness. Checking battery terminals for corrosion and recharging internal lithium cells before they fully deplete prolongs the overall service life of wireless units.
Practical Troubleshooting for Common Hallway Lighting Issues
Persistent flickering in hardwired ceiling lights often points to loose screw terminals, incompatible dimmer switches, or failing LED driver circuitry. When using multi-bulb fixtures, ensure all installed bulbs match in wattage, brand, and dimming specifications to avoid uneven electrical resistance. If a wireless motion sensor fails to illuminate, check whether ambient daylight or nearby nightlights are triggering its daylight shutoff threshold. Most smart sensor lamps are designed to remain idle when room lighting is bright enough to conserve stored battery capacity.
Adhesive failure is another common issue when mounting stick-on lights to painted drywall or textured surfaces. Heavy vibration from slamming hallway doors can weaken standard adhesive foam over time, causing small fixtures to tumble. Applying strong double-sided mounting tape to a thoroughly degreased surface or utilizing small mounting screws provides lasting physical security. Regularly inspecting magnetic plates ensures your pathway lighting remains firmly anchored right where family members need it most.
Careful planning transforms any dark, narrow corridor into a well-balanced walkway that complements the rest of your home. Combining flush mount ceiling fixtures with strategically placed, motion-sensing path lights delivers dependable safety without sacrificing visual warmth. Focus on uniform fixture spacing, compatible bulb color temperatures, and easy-to-reach controls to create a hallway that feels welcoming throughout the day and night.



Write Your Review
No reviews yet. Be the first to share your experience!