


Upgrading kitchen workspaces often begins with dismantling dated fixtures, flickering tape strips, or bulky under-cabinet bars that no longer match your illumination needs. Whether you are prepping for a total remodel or simply upgrading to rechargeable magnetic bars, knowing how to remove led kitchen lighting without gouging cabinet finishes or damaging wiring is essential. Different fixture styles rely on diverse mounting methods ranging from industrial double-sided foam tape to discreet mounting clips and direct electrical junction boxes. Taking a systematic approach protects your cabinetry surfaces and ensures a safe workspace before you install modern replacements.
While routine property upkeep often focuses on cleaning and maintaining LED fixtures, physical removal requires understanding your specific power delivery system. Low-voltage plug-in systems and battery-powered units present minimal electrical risk, but hardwired light bars connected to household line voltage demand strict breaker management. Assessing whether your fixtures use magnetic backing plates, wood screws, or aggressive adhesive backing helps you select the right removal technique. With the right preparation, you can strip away obsolete lighting cleanly and leave your kitchen ready for an efficient, modern lighting layout.

Pros
- Side-emitting lens configuration diffuses light evenly and prevents direct glare into eyes
- Magnetic detachment makes taking the light down for USB-C recharging effortless
- Broad 10% to 100% dimming range allows customized brightness levels for different spaces
- Completely wire-free design requires no electrical work or permanent screw holes, making it ideal for renters
Cons
- Motion sensor operates only in dark environments, so it will not trigger in daylight or brightly lit rooms
- Continuous always-on mode is limited to 5 to 10 hours per charge depending on the brightness setting
- Designed strictly for indoor applications and lacks weatherproofing for wet or exterior locations
The ASOKO Wireless Under-Cabinet LED Light 3-Pack is a rechargeable, motion-activated indoor lighting solution designed for homeowners, apartment renters, and DIY organizers looking to illuminate dark spaces without hiring an electrician. Each 7.8-inch light bar operates completely cord-free, making it an excellent match for kitchen counters, closets, pantries, workshops, and hallways where traditional wall outlets are unavailable.
In terms of light output and optics, each fixture incorporates 33 LED beads engineered with an indirect side-emitting system. Rather than firing light downward directly into your eyes, the diodes project light horizontally across an internal reflector and light guide plate, creating an evenly diffused white illumination that minimizes countertop glare. Users can fine-tune illumination using the 10% to 100% dimming adjustment, making the bars adaptable from low-intensity nighttime guidance to clear task lighting.
The system features three selectable operating modes accessible via a single control button, including an always-on setting and an energy-conserving motion-sensing mode. When set to motion detection, the sensor monitors a 120-degree field up to 10 feet away in dark conditions, automatically powering down after 25 seconds without movement. Power is supplied by an integrated 1500mAh rechargeable battery that charges in approximately 3 hours via USB-C. On motion mode, a single charge can last around 25 days based on an average of 9 activations daily, while continuous always-on use delivers between 5 and 10 hours depending on selected brightness.
Measuring 7.8 by 1.6 inches with a slim 0.36-inch profile and weighing roughly 0.31 pounds, these lights sit flush against cabinetry without dominating visual space. Mounting is completely tool-free thanks to built-in rear magnets that attach directly to ferrous metal surfaces. For wooden shelves, drywall, or laminate cabinetry, the package includes adhesive mounting stickers that hold the lights securely while still allowing you to snap the light bar off the magnetic backing whenever it needs a USB-C charge.
While practical for everyday indoor use, there are a few operational boundaries to keep in mind. The motion sensor is designed specifically to detect motion in dark environments, so it will not trigger in naturally bright or already lit rooms. Additionally, continuous task lighting is constrained by the 1500mAh capacity, meaning heavy all-day use will require frequent recharging compared to hardwired fixtures. These units are also strictly indoor-rated and should not be deployed in wet outdoor or exterior entryway areas.
For renters and homeowners needing an affordable, wire-free accent or task light that installs in seconds, the ASOKO 3-Pack offers strong utility. Its combination of soft side-lit diffusion, magnetic removal, and reliable dark-activated motion sensing makes it a solid investment for under-cabinet surfaces, closet shelves, and dim storage spaces.
The ASOKO light bars feature an integrated motion sensor that scans an arc of 120 degrees at distances up to 10 feet. To preserve battery power, the sensor activates exclusively in dark conditions, instantly illuminating the space upon detecting movement.
After movement ceases, the fixture stays lit for 25 seconds before switching off automatically. Users can toggle between three operational modes with a single push button: continuous always-on mode for dedicated food preparation or cleaning tasks, dark-activated motion sensing for hands-free navigation, and manual off.
Each light bar contains a built-in 1500mAh rechargeable battery, eliminating the recurring cost and waste of disposable alkaline batteries. Recharging is handled through a standard USB-C port, taking approximately 3 hours to achieve a full replenishment from a standard adapter, power bank, or computer port.
Battery longevity varies with the selected setting. When operating continuously in always-on mode, runtime ranges between 5 and 10 hours depending on the chosen brightness level from 10% to 100%. In motion-sensor mode, a single charge can last up to 25 days assuming an average usage pattern of 9 triggers per day.
Installation requires no drilling, wiring, or specialized electrical knowledge. With integrated magnets embedded directly into the rear housing, the fixtures snap directly onto iron-based metal shelving, toolboxes, or appliances without extra hardware.
For non-magnetic surfaces such as under-cabinet wood, melamine, or drywall, you can apply the included adhesive mounting strips. The magnetic connection allows you to pop the light bar off its mounted position effortlessly whenever it requires recharging, then snap it right back into place without replacing adhesive pads.
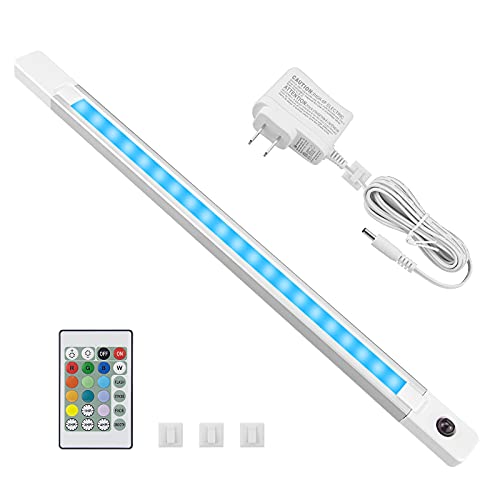
Pros
- Dual-purpose functionality offering functional 4000K task lighting and colorful RGB accents
- Versatile mounting options with included screws, adhesive tape, and built-in magnets
- Convenient 20-foot remote control with dimming, memory recall, and auto-off timer settings
- Ultra-thin 0.6-inch housing hides cleanly beneath cabinetry and shelves
Cons
- Requires a nearby AC outlet, necessitating cable management along walls or cabinets
- Lacks app or smart-home voice integration, relying entirely on the dedicated remote
- White task lighting is fixed at 4000K and does not offer tunable warm-to-cool white adjustment
The BIGMONAT 17.7-inch under-cabinet light bar is a versatile plug-in LED fixture designed for homeowners, apartment renters, and DIYers needing dependable accent or task lighting. Operating via an included AC power adapter, this fixture provides a practical alternative to battery-operated puck lights or complex hardwired lighting setups. Its dual-role design makes it suitable for kitchen countertops, pantry shelves, work desks, cupboards, and television consoles.
In terms of lighting performance, the light bar is equipped with 40 LEDs that output up to 700 lumens of 4000K neutral white illumination. This makes it bright enough to handle daily food prep, reading, or hobby tasks without casting yellow or overly blue tones. In addition to functional white light, the bar features 12 distinct RGB color options and four dynamic lighting modes, including jump and fade transitions. Brightness is fully adjustable via the handheld remote control, allowing users to dial down the intensity for ambient evening backlighting.
The fixture measures 17.7 inches long, 1.1 inches wide, and just 0.6 inches thick, weighing approximately 0.64 pounds. This ultra-slim profile enables the light to mount flush against cabinet undersides, remaining virtually invisible from standard eye level when turned off. The white housing blends easily with painted trim, standard kitchen cabinetry, and modern shelving units.
Installation is straightforward and accommodates different living situations. Renters can use the included double-sided adhesive tape or magnetic mounting points to secure the fixture without drilling into furniture. Homeowners seeking a permanent setup can use the supplied mounting screws. The handheld remote operates within a 20-foot range and includes a helpful memory function that retains your chosen color and brightness settings when turned off. It also features 1, 2, 3, and 4-hour shutoff timers to prevent accidental overnight operation.
A few practical limitations should be noted prior to purchase. Because this is an AC adapter-powered unit, placement depends on access to a nearby standard electrical outlet, which may require tucking or clipping the power cord along cabinet edges. Additionally, this fixture does not support Wi-Fi, Bluetooth, or smart-home ecosystems like Alexa or Google Assistant, meaning all adjustments must be made using the bundled remote control. The primary white light is also fixed at 4000K, so users wanting warm 2700K or cool 5000K white will need to look elsewhere.
For buyers seeking an affordable, multi-functional lighting upgrade with zero electrical hardwiring, the BIGMONAT light bar offers a well-rounded balance of bright task output, fun accent colors, and flexible mounting.
The BIGMONAT under-cabinet light bar includes three distinct mounting methods: screws, double-sided tape, and magnetic points. Renters and small-space dwellers can secure the light quickly with adhesive tape or magnets, avoiding surface damage or drill holes in rental property cabinetry.
For permanent workshop, desk, or kitchen installations, the provided mounting screws ensure the bar remains firmly anchored over time. Because the fixture operates via an included AC adapter, users should confirm the light bar is positioned within reach of a wall outlet before finalizing placement.
The included handheld remote control operates the light bar from up to 20 feet away, providing direct access to power, brightness dimming, and color options. An integrated memory feature ensures the light turns back on at the last selected brightness level and color state when shut off with the remote.
Users can cycle through 12 preset colors or switch between four dynamic transition modes, including jump and fade effects. The remote also includes timer buttons for 1, 2, 3, and 4-hour intervals, making it easy to use as a nightlight or kitchen display light that turns off automatically.

Complete Guide to Removing Kitchen LED Lighting Fixtures Safely
Removing LED kitchen lighting requires identifying the mounting method, cutting power at the source, and detaching the fixture without marring cabinet finishes or drywall. Most modern kitchen installations feature battery-operated magnetic bars, low-voltage plug-in light bars, flexible adhesive tape strips, or hardwired line-voltage fixtures. The exact removal technique depends entirely on whether your hardware is secured with mechanical screws, snap-in clips, magnetic plates, or heavy-duty foam adhesive. Once power is isolated, you can safely extract the lighting components, clean residual adhesive, and leave the cabinetry ready for your next lighting configuration.
Identifying Kitchen LED Power Systems and Electrical Connections
Kitchen LED fixtures receive electrical power through three common formats: direct line-voltage wiring, plug-in low-voltage transformers, or integrated rechargeable batteries. Battery-powered units, such as wireless bars with USB-C ports, eliminate electrical shock risks entirely during dismounting. In contrast, plug-in units like the BIGMONAT light bar rely on an external AC adapter that connects to a standard wall receptacle. Hardwired under-cabinet fixtures connect directly into household branch circuits through flexible conduit or non-metallic sheathed cable. Knowing which system powers your lighting dictates your initial safety precautions and the physical detachment sequence.
Electrical safety demands complete circuit de-energization before touching any wired components. For plug-in bars and magnetic fixtures, unplugging the power supply brick or removing the battery unit renders the installation completely dead. Hardwired light fixtures require turning off the dedicated circuit breaker at the main electrical distribution panel. You should always confirm the absence of electrical potential using a reliable non-contact voltage detector before loosening junction covers. Never rely solely on a wall switch or remote control to isolate electrical power, as switched neutrals or back-fed conductors can still deliver dangerous shocks.
Removing Magnetic and Quick-Release Under-Cabinet Light Bars
Modern under-cabinet light bars frequently incorporate internal neodymium magnets that cling to steel mounting plates affixed beneath cabinetry. Fixtures such as the ASOKO motion sensor light and MEKKLEON rechargeable bar utilize this modular design to facilitate frequent charging. To dismount the main light housing, grasp both ends of the fixture firmly and pull directly downward to break the magnetic bond. Some right-angle models or long bars may release more easily by pivoting one end slightly outward before separating the unit. The light body will detach instantly, leaving only the thin metal bracket or adhesive steel plates behind.
Extracting the remaining magnetic base plates requires inspecting how the mounting steel is secured to your cabinet wood. Many manufacturers supply thin metal patches backed with heavy-duty double-sided tape, while others include small countersunk pilot screws. If the metal plate is secured with screws, support the bracket with your free hand while backing out each fastener using a manual screwdriver. If the bracket relies purely on double-sided foam tape, do not yank the metal plate violently, as this can splinter wood veneer or tear off cabinet laminates. Instead, pry gently with a plastic putty knife or use a release solvent to ease the adhesive grip.
Dismantling Screw-Mounted Fixtures and Aluminum Mounting Channels
Rigid LED light bars and aluminum extrusion channels are commonly secured beneath upper cabinets using direct mechanical fasteners. These fixtures often conceal their mounting screws behind frosted snap-in diffuser lenses or sliding end caps. To access the screw heads, insert the flat edge of a plastic trim tool into the seam of the plastic diffuser and gently pop it out of the aluminum channel. Once the diffuser cover is removed, inspect the interior aluminum tray to locate the countersunk wood screws holding the track against the underside of the cabinet.
Backing out mounting screws requires supporting the weight of the light fixture throughout the extraction process. If you remove screws from one end while allowing the opposite end to dangle, the fixture will exert levered torque against the remaining fasteners, potentially stripping the cabinet wood. Use a compact manual screwdriver or a low-torque electric driver with a properly fitting bit to prevent cam-out damage to the screw heads. Keep one hand pressed upward against the center of the light bar while withdrawing the final screw. Once all fasteners are clear, lower the fixture straight down and place the hardware into a small container for safekeeping.
Releasing Sticky Adhesive LED Strips Without Damaging Cabinet Veneer
Flexible LED strip lights and thin ribbon fixtures adhere to cabinet surfaces using pressure-sensitive acrylic foam tape. Over months of exposure to kitchen heat and cooking grease, this adhesive backing cures into a resilient bond that can tear wood stain or cabinet paint if pulled dry. To loosen this bond safely, warm the strip light gently using a household hair dryer set to medium heat. Direct the warm airflow along a six-inch section of the tape for fifteen to twenty seconds to soften the tacky elastomeric polymers. Avoid high-heat heat guns, which can scorch cabinet finishes or melt delicate plastic laminate edging.
Once the adhesive softens, slip a length of strong nylon fishing line or unflavored dental floss behind the leading edge of the LED strip. Work the strand back and forth in a gentle sawing motion, slicing through the foam core of the double-sided tape rather than peeling the strip upward. This horizontal shearing action prevents vertical tension from lifting delicate wood grains or peeling decorative foil veneers. Continue heating and sawing along the entire run of the tape until the ribbon falls free from the cabinet base. This method preserves your cabinetry surfaces and keeps the extracted LED strip intact for potential reuse elsewhere.
Removing Stubborn Tape Residue and Cleaning Cabinetry Surfaces
Removing the physical light strip almost always leaves behind a layer of stubborn foam residue and tacky adhesive film. Rubbing this residue aggressively with rough scouring pads or sharp razor blades will scratch cabinet finishes permanently. Instead, apply a small amount of isopropyl alcohol or a mild citrus-based adhesive remover directly to a clean microfiber cloth. Dab the saturated cloth against the sticky residue and allow the solvent to dwell for two to three minutes to break down the sticky acrylic polymers. The chemical action dissolves the bond without degrading factory clear coats or cured polyurethane finishes.
After allowing the cleaner to dwell, roll the softened residue off the wood surface using your thumb or a flexible plastic scraper. Wipe the cleaned area immediately with a fresh, damp cloth to remove any solvent residue before it can penetrate into wood grain seams. Dry the underside of the cabinet thoroughly using a soft lint-free towel to inspect the finish under good ambient lighting. If any greasy kitchen film remains from years of cooking exposure, wash the surface with a dilute dish soap solution and let it dry completely. Proper cleaning ensures that future lighting installations adhere securely without shifting over time.
Disconnecting Hardwired Line-Voltage Kitchen Light Fixtures
Hardwired under-cabinet fixtures and fluorescent-replacement LED boxes require direct interaction with household electrical circuits. After confirming that the circuit breaker is switched off and verifying dead conductors, loosen the outer housing screws to open the fixture wiring compartment. Inside, you will find incoming circuit conductors connected to internal fixture leads with twist-on wire nuts or push-in connectors. Carefully unscrew the wire nuts counterclockwise, separating the black hot wires, white neutral wires, and bare copper or green equipment grounding wires. Avoid cutting the household supply conductors short, as maintaining adequate lead length simplifies future fixture installations.
Once the electrical conductors are separated, you must release the cable clamp that secures the incoming power feed to the fixture chassis. Metal light housings incorporate mechanical cable connectors or push-in Romex clamps at their knockout entry holes. Loosen the locknut or clamping screws securing the household cable to the fixture housing so the wires can slide out freely. Carefully support the fixture body as you guide the insulated copper wires through the knockout hole. Cap the exposed household electrical conductors with wire nuts immediately, even with the breaker turned off, to ensure complete physical protection.
Extracting Recessed Ceiling and Soffit LED Downlights
Kitchen ceilings and soffits frequently feature ultra-thin wafer LED downlights or retrofit can lights that require specific dismounting procedures. These modern pucks and recessed modules do not screw into joists; instead, they stay seated against the ceiling drywall via heavy spring-loaded retention clips. To dismount a wafer downlight, grip the outer trim ring firmly with your fingertips and pull downward evenly by about one inch. This slight drop exposes the steel torsion springs positioned on opposite sides of the fixture housing. Take care during this initial pull to avoid yanking down hard, which can crack plaster or tear fragile drywall paper.
Once the torsion springs become visible, slide your fingers beneath the trim to press the spring arms upward against the sides of the fixture. Holding the springs tightly in their retracted position prevents them from snapping violently against the edge of the drywall hole as the unit exits the ceiling. Carefully lower the round light housing through the cutout until the low-voltage wire lead and twist-lock connector emerge. Untwist the cable coupling to disconnect the downlight from its remote driver box. If you must remove the driver box as well, reach into the ceiling cavity, open the metal junction box, and disconnect the line-voltage connections after verifying power isolation.
Inspecting Cabinetry and Planning Future Lighting Upgrades
Dismantling old fixtures provides an excellent opportunity to inspect the structural condition of your cabinet frames and surrounding electrical pathways. Examine the lower cabinet lips for loose trim molding, water damage near the sink, or localized heat marks from older halogen fixtures. If previous light installations left exposed screw holes, fill them with matching wood putty or color-matched wax fill sticks to seal the wood from kitchen moisture. Smoothing out these minor blemishes restores a pristine look to your workspace and creates a clean mounting foundation for new light bars.
When replacing removed fixtures, consider whether your kitchen workflow benefits more from hardwired bars or modern cordless fixtures. Upgrading to magnetic, rechargeable light bars allows you to reposition lighting freely between prep counters, pantries, and sink areas without drilling fresh holes. If your lighting renovation extends beyond task counters into broader open-concept living spaces, reviewing budget-friendly LED fixtures for large rooms can help guide your choices for larger overhead ambient fixtures. Matching your functional task requirements with the proper fixture dimensions ensures that your newly illuminated kitchen remains both practical and visually appealing.
Proper Electronic Disposal and Circuit Verification
Extracted LED light bars, lithium-ion battery modules, and electronic drivers should never be discarded directly into household trash bins. Rechargeable models, such as units containing 1500mAh or 3200mAh lithium cells, must be dropped off at certified electronic recycling centers or battery drop-off locations to prevent hazardous waste risks. Traditional LED fixtures with integrated circuit boards and metal housings can similarly be diverted through municipal e-waste recycling programs. Sorting your old components responsibly keeps hazardous heavy metals and reusable aluminum channels out of local landfills while supporting sustainable material reclamation.
Before restoring electrical power to your kitchen breaker panel, double-check all disconnected wiring terminations. If a hardwired fixture was removed and not immediately replaced, enclose the capped household wires safely inside an approved junction box sealed with a solid blank cover plate. Never leave live conductors dangling loosely beneath upper cabinets or tucked unsecured inside wall cavities. Once all wiring is verified and isolated according to local building codes, switch the breaker back on to re-energize your remaining household circuits. Taking these final verification steps guarantees a safe kitchen environment that is fully prepped for your next lighting upgrade.




Write Your Review
No reviews yet. Be the first to share your experience!